圖文好毒版
http://www.xfastest.com/thread-85083-1-1.html
=================================================
INTEL處理器的超頻性能一直是玩家們所津津樂道,各家主機板廠也因應處理卓越的超頻
性能推出不同定位的主機板,
要完全壓榨出i5-3570K、I7-3770K這類不鎖頻處理器的性能,採用Z77晶片的主板當然是
少不了,因此各家知名的主機板廠都會規畫高階超頻系列的Z77主機板,微星在主機板市場經營多
年,累積不少主機板相關技術,在定位超頻領域的主機板自然也少不了這家老字號的廠商
早在先前6月份Computex期間,MSI的展場攤位上就已經悄悄地公布了即將推出全新的Z77
MPower及X79 MPower系列主機板,時間過了一季,Z77 Mpower終於現身,
按照老規矩,當然要先來嘗鮮一下囉!!! 接著來看看Z77 Mpower的完全寫真吧!!
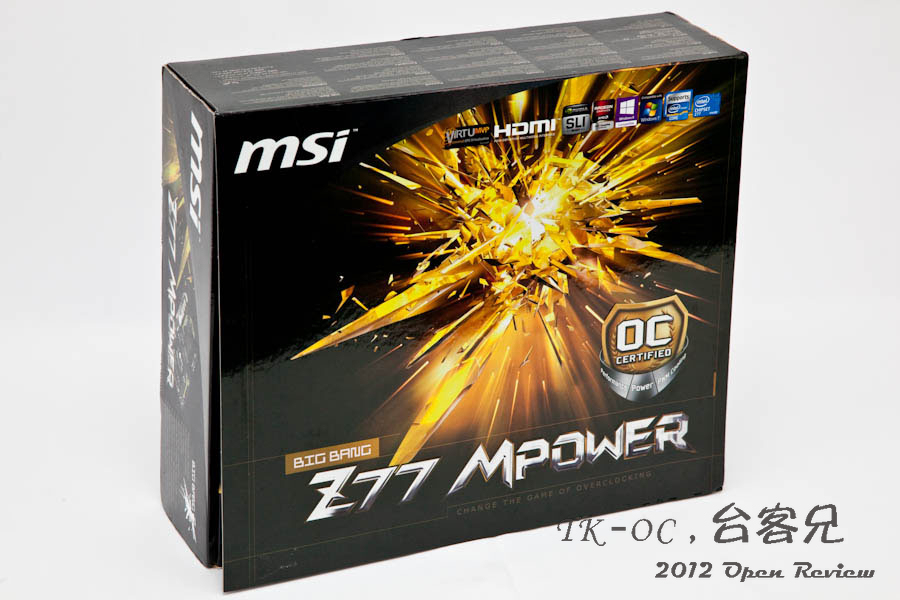
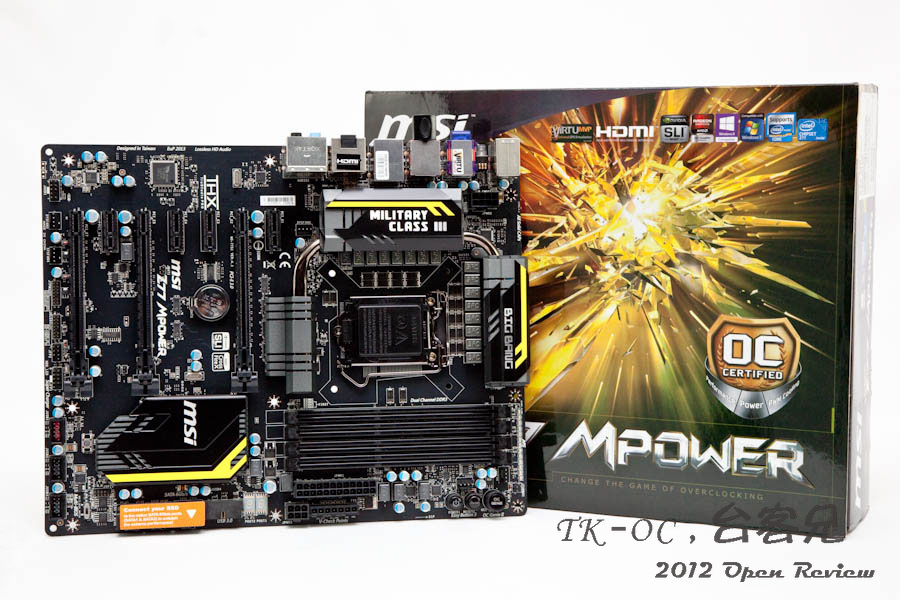
既然是全新的MPower系列,彩盒自然與其他微星自家Z77主板不同。
彩盒右邊OC Certifled字樣,想必當然是為超頻玩家們量身打造的主機板。
http://picx.xfastest.com/japan0827/MPower/1.jpg
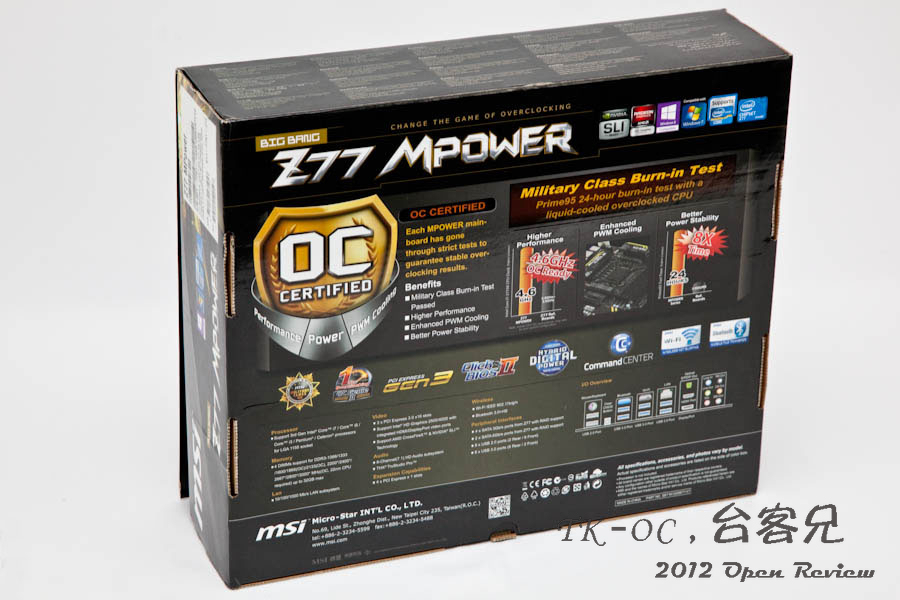
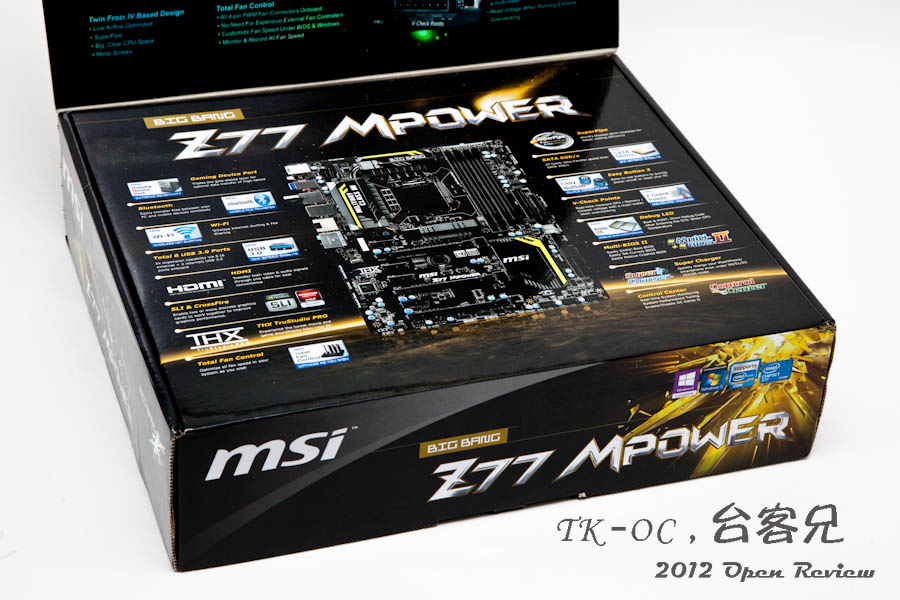
彩盒背面除了各項功能的敘述外,就前面OC Certified部分做更完整的敘述,
強調這片主機板經過微星的研究測試,先將CPU超頻至4.6G並使用水冷方式散熱,
接著採用嚴苛的Prime95燒機軟體24小時燒機不間斷,仍能維持穩定且不當機,
足見微星在PWN供電穩壓部份花了不少心思。
http://picx.xfastest.com/japan0827/MPower/2.jpg
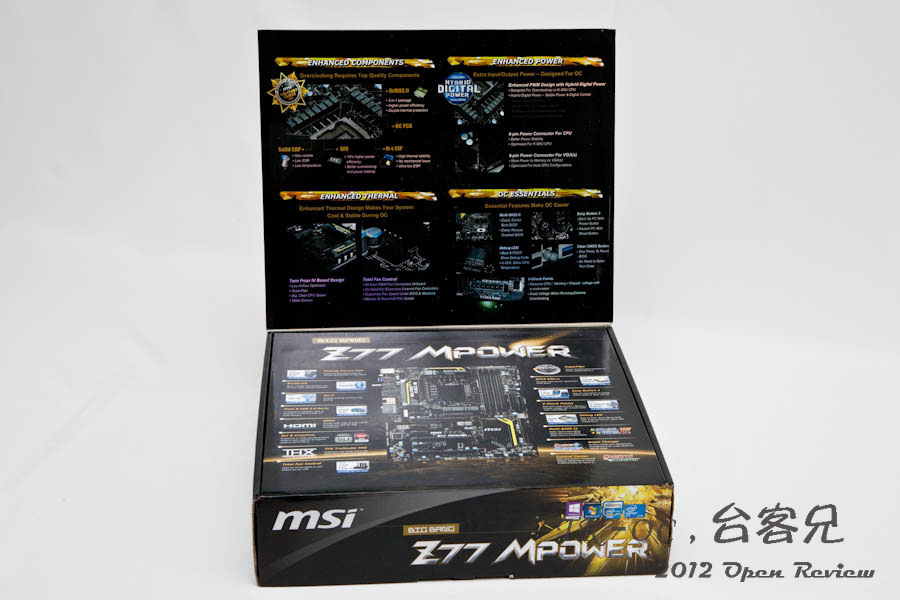
由於Z77 MPower主機板的特色及技術相當多,彩盒設計上也採用高階系列產品的包裝方式
在產品說明上比偏向實用性質的主機板更豐富。
http://picx.xfastest.com/japan0827/MPower/3.jpg
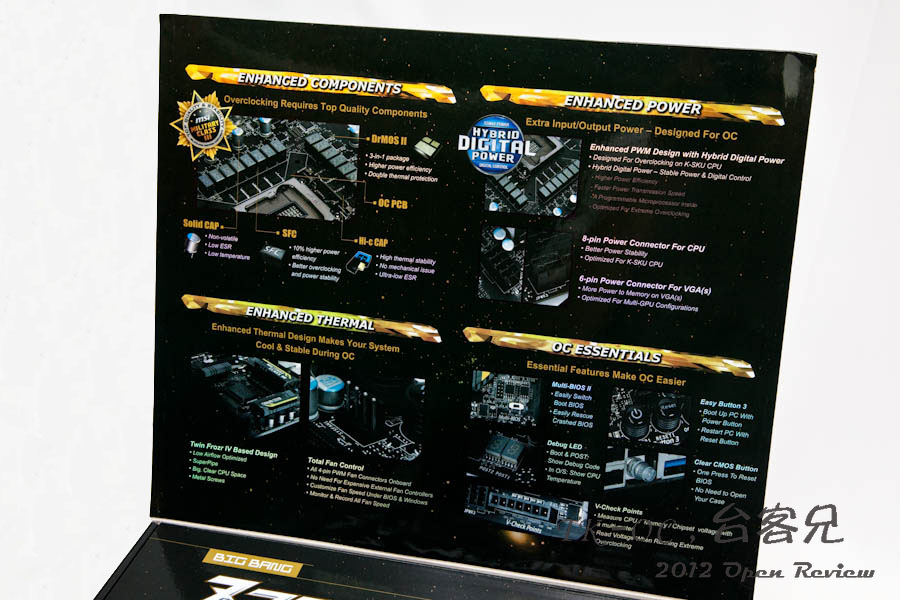
上頁主要說明Z77 MPower主機板上導入了DrMOS II技術及各項軍規元件,
除了各項便利超頻玩家們如Debug Led及電壓探測點,另外超頻最重要的供電穩定以及散
熱設計,在在都是為了追求極限超頻而生的。
http://picx.xfastest.com/japan0827/MPower/4.jpg
別於其他品牌主機板的不同,內建BlueTooth藍牙功能,
WiFi無線網路Z77 MPower並沒有為了極限超頻而犧牲掉其他附屬的功能。
http://picx.xfastest.com/japan0827/MPower/5.jpg
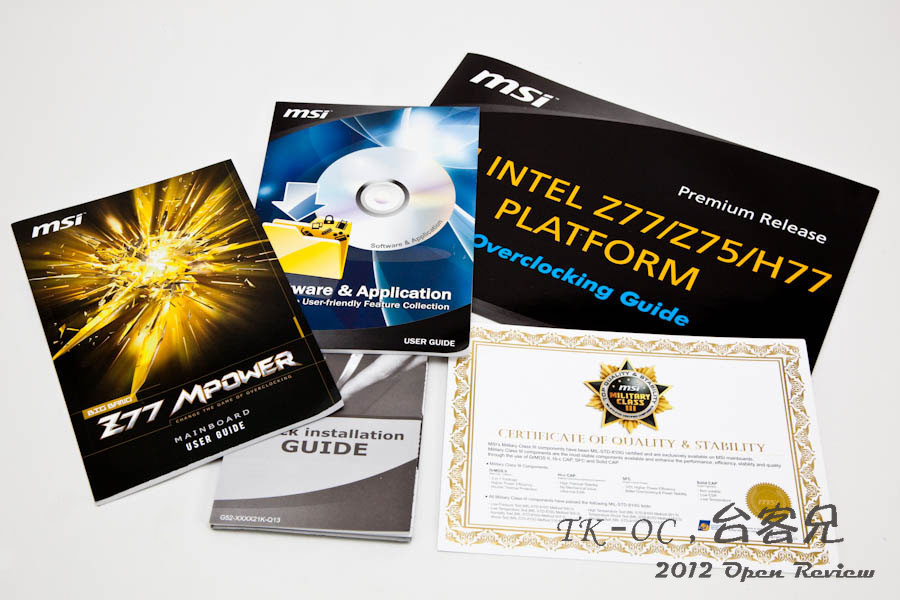
各項說明手冊清楚說明主機板功能及光碟片內附的軟體功能,
對於不熟悉超頻的新手們是非常實用的參考工具。
http://picx.xfastest.com/japan0827/MPower/6.jpg
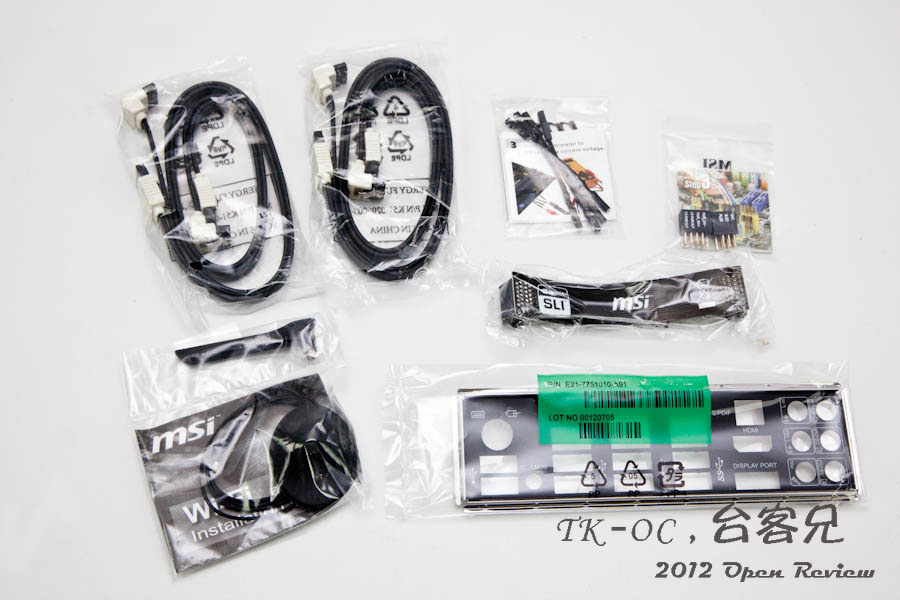
配件部分雖稱不上極為豐富,但該有的一件也不少,除了基本的SATA傳輸線及主機板背板
外,還有無線網路天線及SLI橋接器及便利的前置面板線材轉接座,另外也內附了便利超頻玩
家們接上電壓表探針的線材。
http://picx.xfastest.com/japan0827/MPower/7.jpg
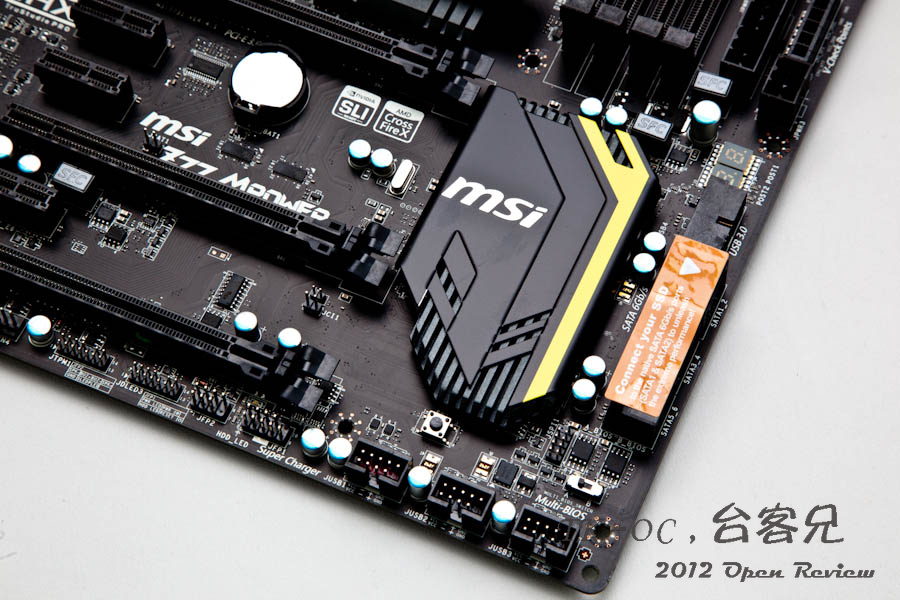
別於以往微星慣用的藍黑配色,採用黑黃配色的Z77 MPower似乎與他牌主機板廠有著一致
的默契,跳脫以往超頻主機板慣用的黑紅機板色調。
http://picx.xfastest.com/japan0827/MPower/8.jpg
Z77 MPower沒有多餘的華麗做工,低調沉穩的全黑配色勾勒黃色的線條帶入了性能元素,
主機板反而顯得更紮實內斂又透露出些許不平凡。
http://picx.xfastest.com/japan0827/MPower/9.jpg
Z77 MPower主機板背面一覽。
http://picx.xfastest.com/japan0827/MPower/10.jpg
16相SFC超導磁電感加上Hi-C CAP鉭質電容及Solid CAP固態電容組成了微星獨家的
MILITARY III 第三代軍規料件,
大型散熱片確保周邊元件在長時間的運作也能維持在穩定的工作溫度。
http://picx.xfastest.com/japan0827/MPower/11.jpg
為便利裸測超頻的玩家,主機板上設置了Power & Reset按鍵,
即便是對超頻一竅不通的又想體驗超頻樂趣的朋友,OC Genie II 超頻按鈕按下的立即超
頻功能便利不少使用者。
http://picx.xfastest.com/japan0827/MPower/12.jpg
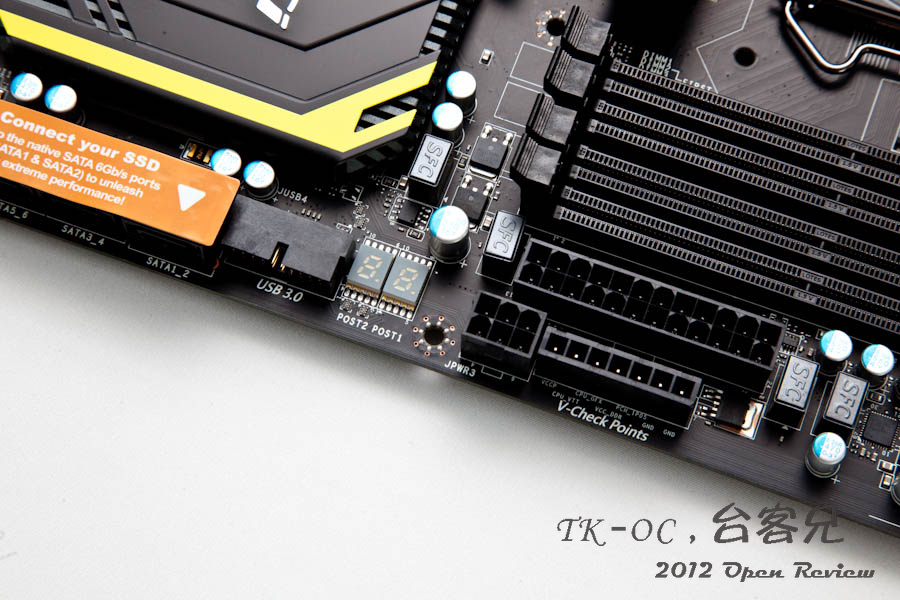
下方的V-Check Points則提供進階超頻玩家採用三用電表探測CPU VCORE、VTT、DDR及PCH
的電壓點,左側的Debug燈號便利在超頻過程中容易發生不開機的簡易判別指示,
下方與顯示卡6Pin供電相同的電源插座則可以提供顯示卡更穩定的超頻供電。
Z77 MPower在這部分可說是囊括了所有對超頻感興趣的使用者,即便是超頻新手或是進階
玩家,都能在這張主機板上找到符合自己使用的功能。
http://picx.xfastest.com/japan0827/MPower/13.jpg
大型鋁製散熱片協助主機板被動散熱確保穩定工作,Z77 MPower提供Multi BIOS功能,
可透過指撥開關切換避免更新BIOS韌體造成毀損。
http://picx.xfastest.com/japan0827/MPower/14.jpg
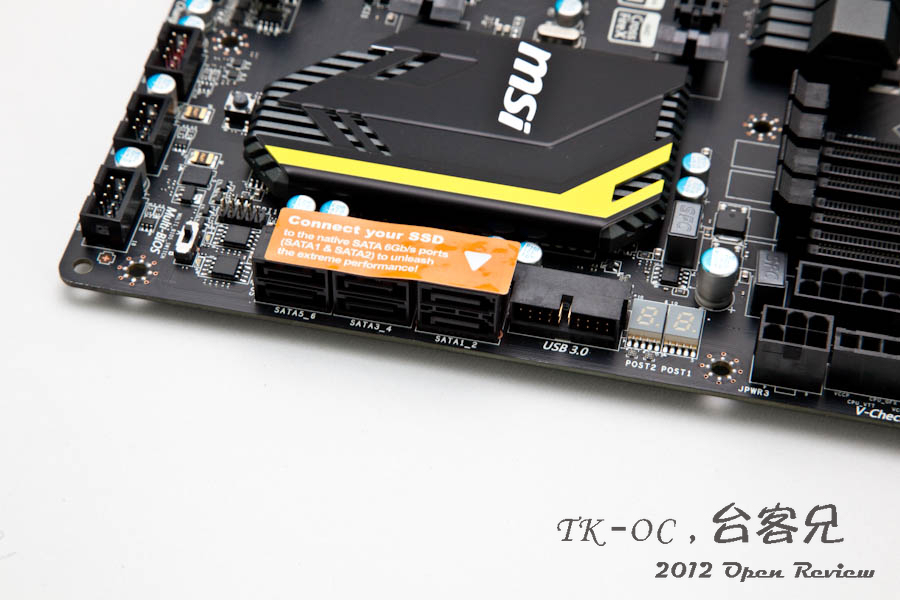
由於產品定位不同,Z77 MPower並不如自家如ZA77A-GD80一樣提供四組SATA III Port,
2組SATA3加上4組SATA2共6組SATA Port對於一般日常使用已經相當夠用。
另外轉為90度的USB3.0連接座對於機箱內的線材整理便利不少。
http://picx.xfastest.com/japan0827/MPower/15.jpg
Z77 MPower支援PCI-E GEN3確保最新顯示卡的頻寬不至於降低,另外同時也支援3WAYs
SLI & Cross FireX。
http://picx.xfastest.com/japan0827/MPower/16.jpg
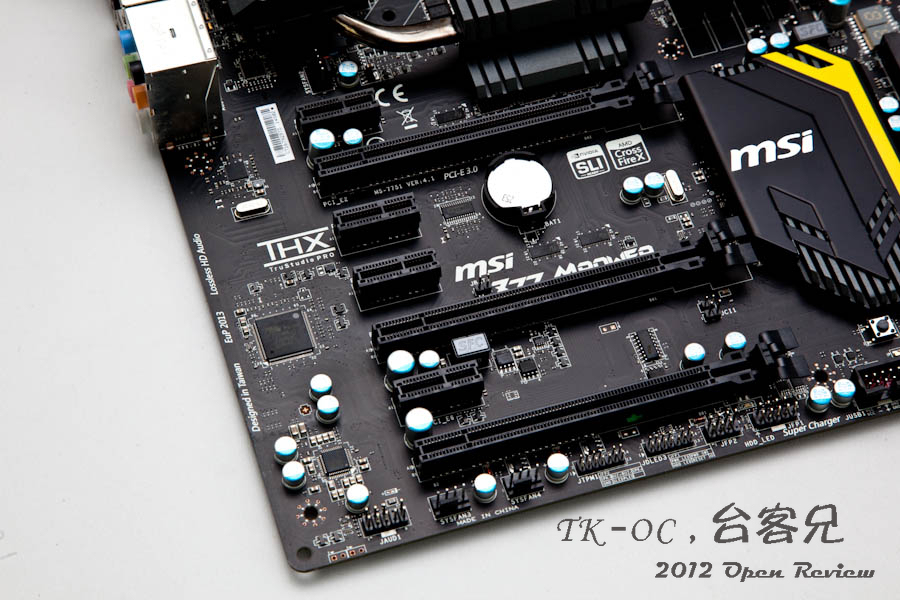
音效晶片採用Realtek ALC 898擁有7.1聲道音效並支援THX TruStudio PRO,提供優秀的
音效體驗。
http://picx.xfastest.com/japan0827/MPower/17.jpg
SUPER/IO部分則使用了微星自家慣用的Fintek F71889AD控制晶片。
http://picx.xfastest.com/japan0827/MPower/18.jpg
有線網路部分則為常見的Realtek RTL8111E網路晶片
http://picx.xfastest.com/japan0827/MPower/19.jpg
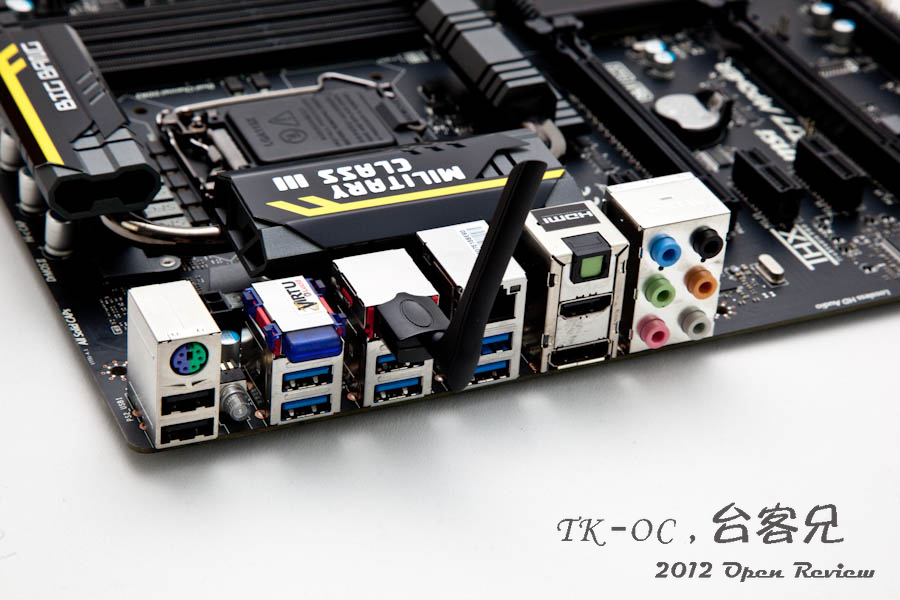
Z77 MPower背板後端支援的連接埠相當豐富,內建了BlueTooth藍芽功能以及WIFI無線網
路提供不少便利性。
http://picx.xfastest.com/japan0827/MPower/20.jpg
前面提到的配件內附短天線,插上主機板也不占空間。
http://picx.xfastest.com/japan0827/MPower/21.jpg
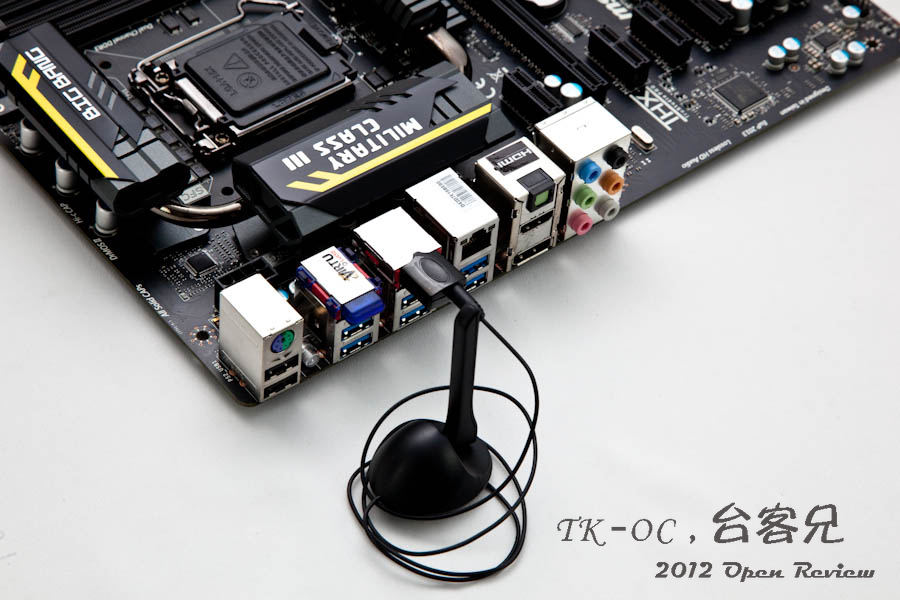
如果主機置放在桌子下方或角落邊難免會影響無線網路的效果,
這時可以改用延長的天線座將天線延伸到桌面上就不會引響訊號傳輸。
http://picx.xfastest.com/japan0827/MPower/22.jpg
消費者的口味被貼心的廠商越養越大了,以前買產品著重效能,
現在除了效能更要產品看起來有FU有爽度才能讓消費者乖乖掏錢出來買單。
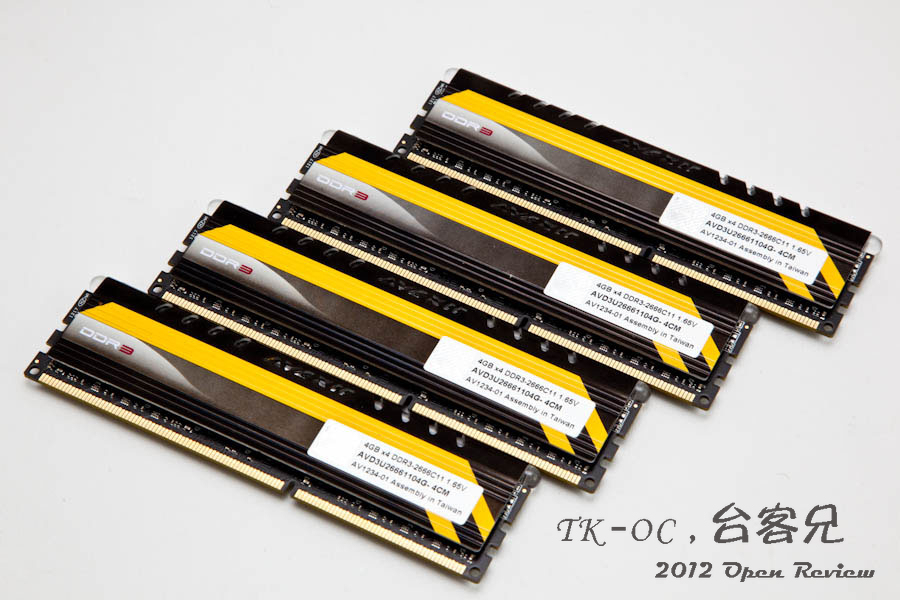
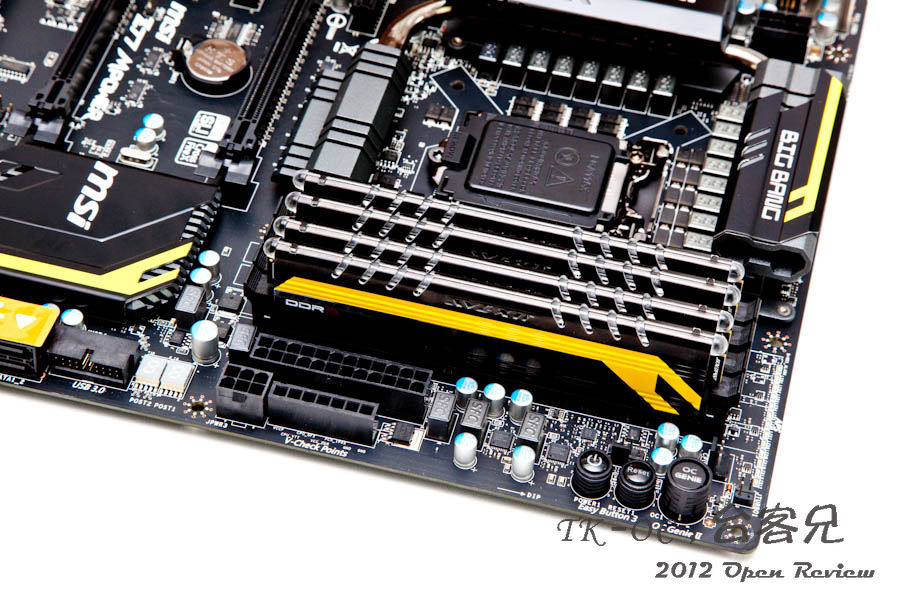
微星與AVEXIR宇惟科技在記憶體與主機板搭配上有長久的合作關係,
因此微星在推出Z77 MPower主機板後,AVEXIR也從善如流推出黑黃配色的CORE系列超頻記
憶體,圖中為DDR3-2666 4GB *4共16GB的記憶體。
http://picx.xfastest.com/japan0827/MPower/23.jpg
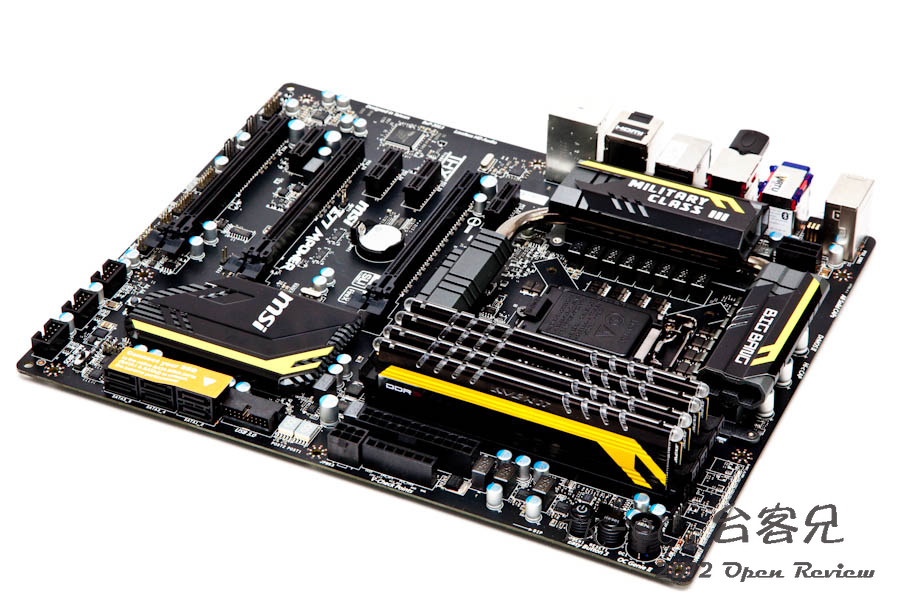
願意花心思總是會得到辛苦的代價,安插上主機板是不是呈現相當一致的整體感呢!!
為了滿足消費者這些廠商還真的是得花不少苦心啊~
http://picx.xfastest.com/japan0827/MPower/24.jpg
AVEXIR這款記憶體上方是有呼吸指示燈的,可惜手上這組是發藍色的呼吸燈,若是黃色的
呼吸燈號就更加完美囉~
http://picx.xfastest.com/japan0827/MPower/25.jpg
接著來看看MSI UEFI BIOS內容,主頁面選單與先前推出的其他主機板相同,
外觀簡潔一目了然。
http://picx.xfastest.com/japan0827/MPower/26.jpg
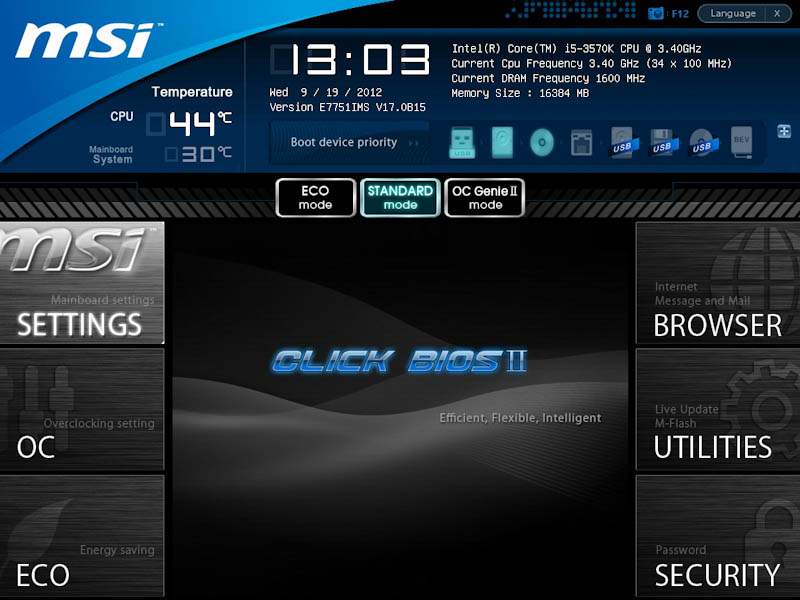
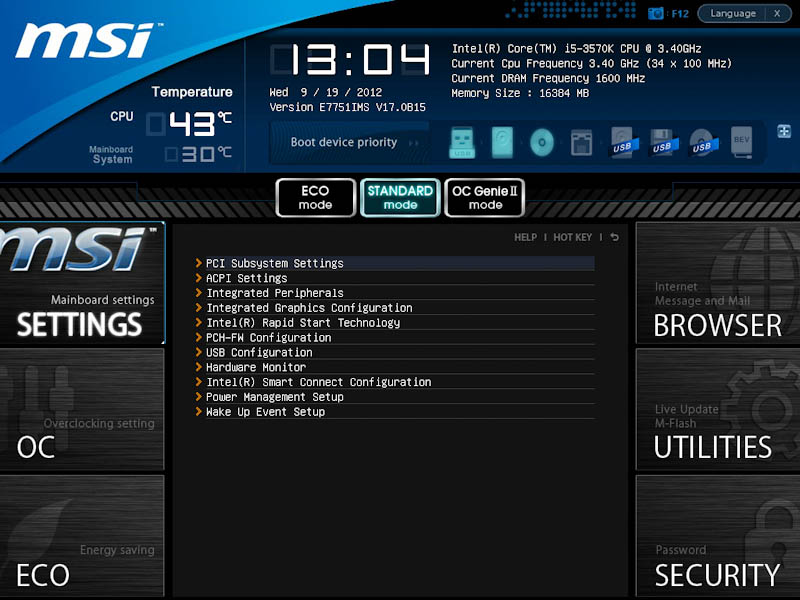
各項主機基本功能的開啟與關閉都能在SETTINGS選項裡面找到。
http://picx.xfastest.com/japan0827/MPower/27.jpg
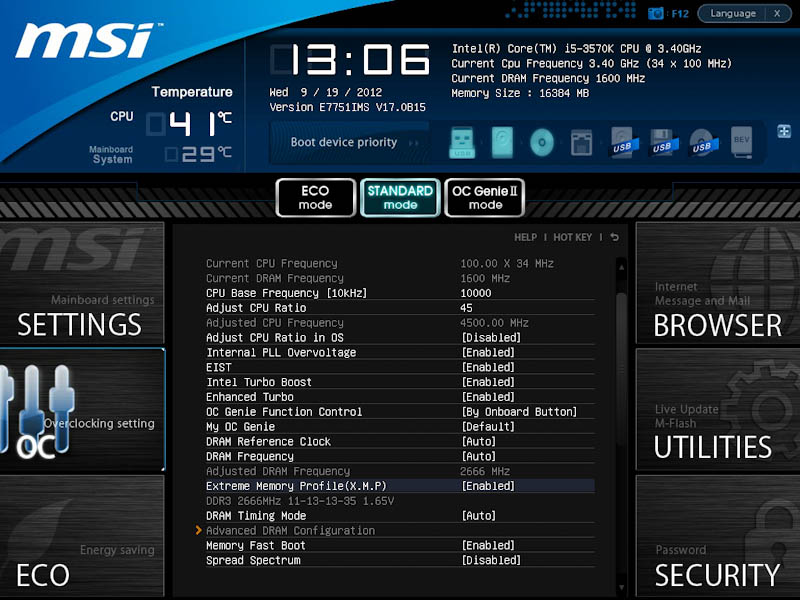
超頻設定自然是Z77 MPower最重要的強項了,可以看到選單裡面有關超頻的設定選項非常
多,
進階超頻高手對於這樣的設定應該會非常滿意。
http://picx.xfastest.com/japan0827/MPower/28.jpg
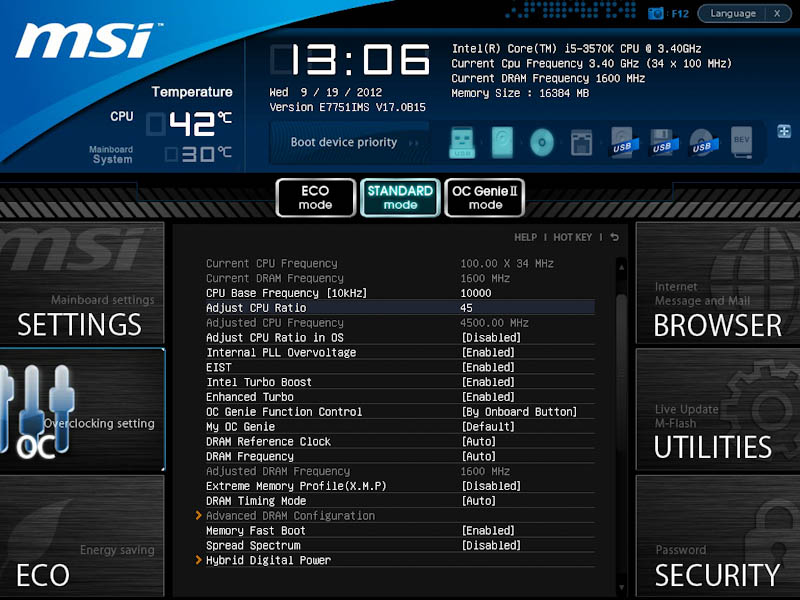
超頻設定部份下半部主要提供處理器以及記憶體的供電設定。
http://picx.xfastest.com/japan0827/MPower/29.jpg

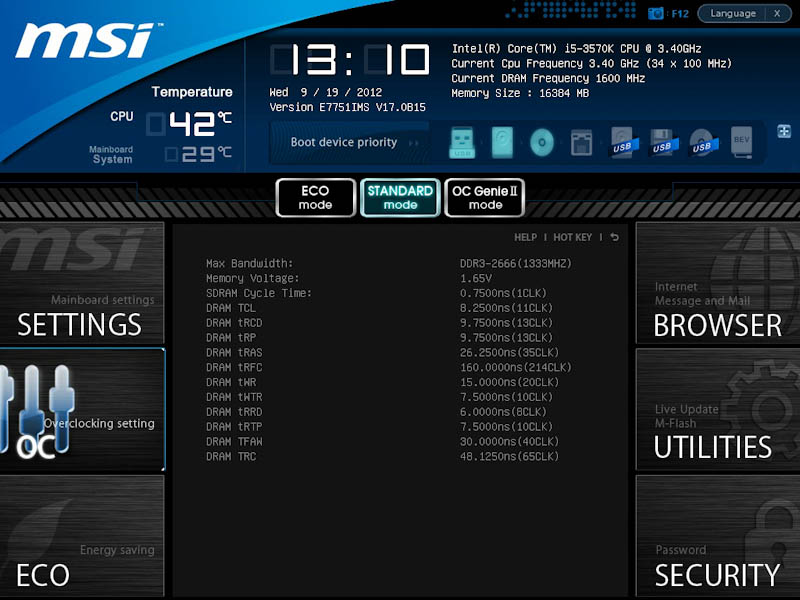
記憶體部分支援X.M.P是一定要的,像這次搭配AVEXIR 的記憶體測試,
可以看到X.M.P選單中顯示DDR3 2666MHz CL11-13-13-35 1.65V,只要設定為開啟立刻就
會以這個頻率設定運作。
http://picx.xfastest.com/japan0827/MPower/30.jpg
記憶體中的X.M.P選項提供非常清楚的記憶體資訊
http://picx.xfastest.com/japan0827/MPower/34.jpg
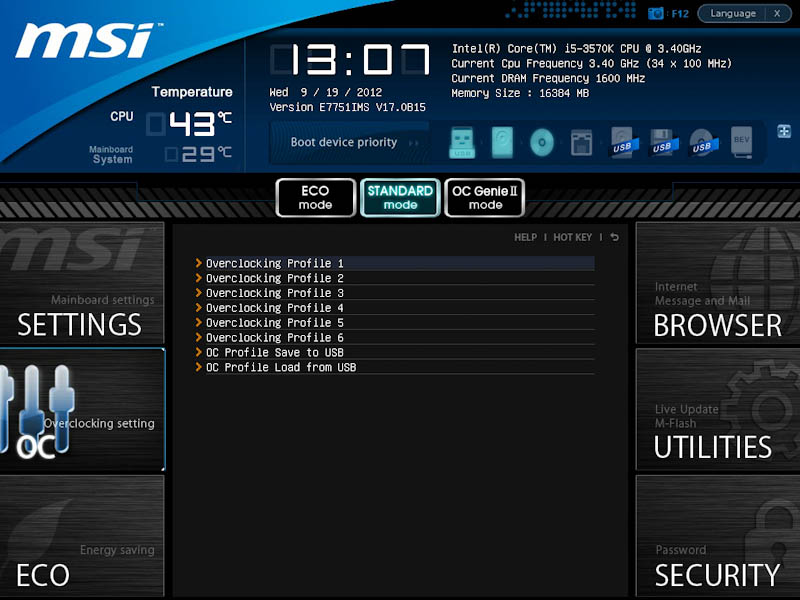
BIOS同時也提供6組儲存超頻設定檔功能,還可以將超頻設定存放在USB隨身碟中,
方便寄送給同樣使用Z77MPower的朋友研究使用。
http://picx.xfastest.com/japan0827/MPower/32.jpg
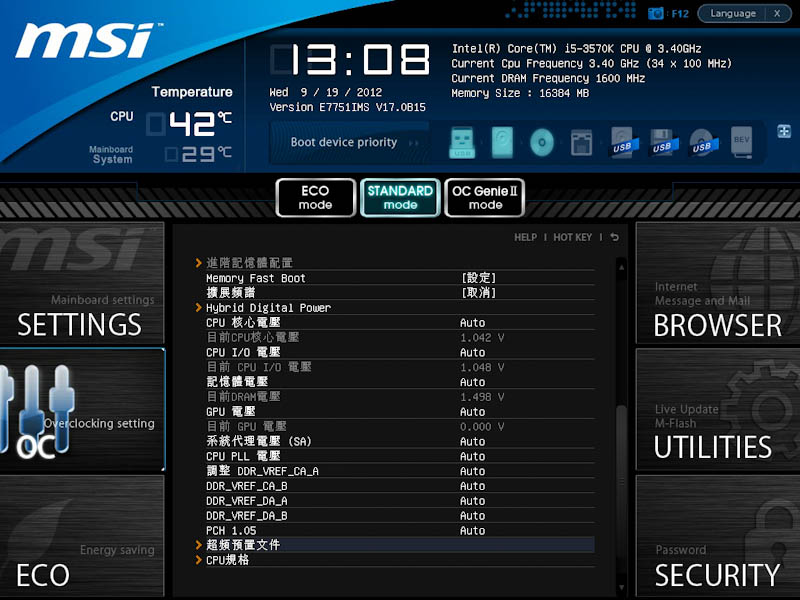
對英文BIOS感到畏懼的朋友也可以改為中文版本,不過說真的,長年使用設定BIOS的習慣
,改成中文反而更看不懂@ @”
http://picx.xfastest.com/japan0827/MPower/35.jpg
UTILITIES的選項中可以讓使用者快速更新主機板的BIOS,只要安裝好網路線,也可線上
更新BIOS資料。
http://picx.xfastest.com/japan0827/MPower/37.jpg
接著直接上機測試看看Z77 MPOWER,下面是這次測試採用的平台
CPU: Intel I7 3570K ES
MB: MSI Z77 MPower
Cooler: Antec KUHLER H2O 920
DRAM: AVERXIR Core Series DDR3-2666 CL11-13-13-35 1.65V
VGA: Lantic HD6670 GDDR5-1G
HD: OCZ VERTEX3 MAX Iops 120G
POWER:Antec HCP-1200W
首先先用CPU-Z查看各項設定,CPU部分維持預設頻率,記憶體預設DDR3-1600
CL-11-11-11-28。
http://picx.xfastest.com/japan0827/MPower/39.jpg
使用PCMark Vantage測試各項分數
http://picx.xfastest.com/japan0827/MPower/40.jpg
使用PCMark7測試得到4751分
http://picx.xfastest.com/japan0827/MPower/41.jpg
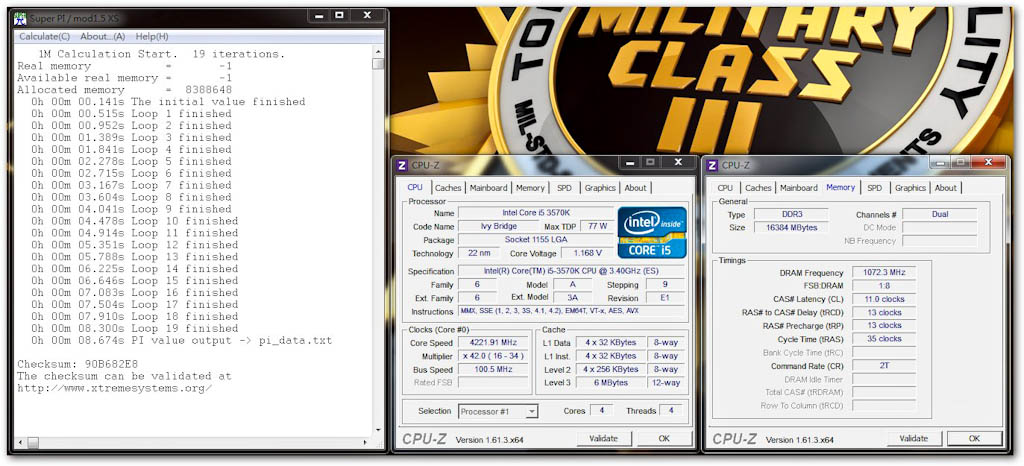
接著使用Super PI測試預設頻率下的處理器運算效能,計算1MB週期時間為9.641秒。
http://picx.xfastest.com/japan0827/MPower/42.jpg

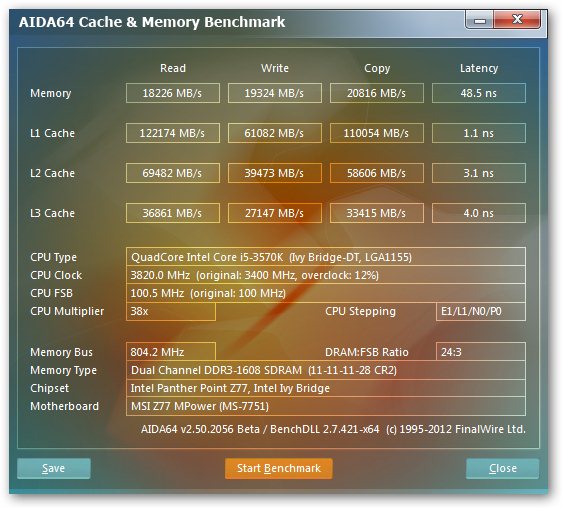
使用AIDA64測試DDR3-1600的記憶體頻寬,讀取部分達18226MB/s,寫入則有19324MB/s。
http://picx.xfastest.com/japan0827/MPower/43.jpg
懶得手動超頻或是不熟悉超頻的朋友,按下機板上的OC Genie II 一鍵超頻功能,
主機板馬上會自動超頻解決設定的麻煩,可以看到當按下按鈕後,
處理器已經自動超頻到4.22G,記憶體也跑到DDR3-2144 CL11-13-13-35,
同樣使用SUPER PI測試,計算時間進步到8.674秒。進步接近一秒。
http://picx.xfastest.com/japan0827/MPower/44.jpg
AIDA64測試DDR3-2144的記憶體頻寬,讀取部分提升達22140MB/s,寫入則有21924MB/s。
http://picx.xfastest.com/japan0827/MPower/45.jpg

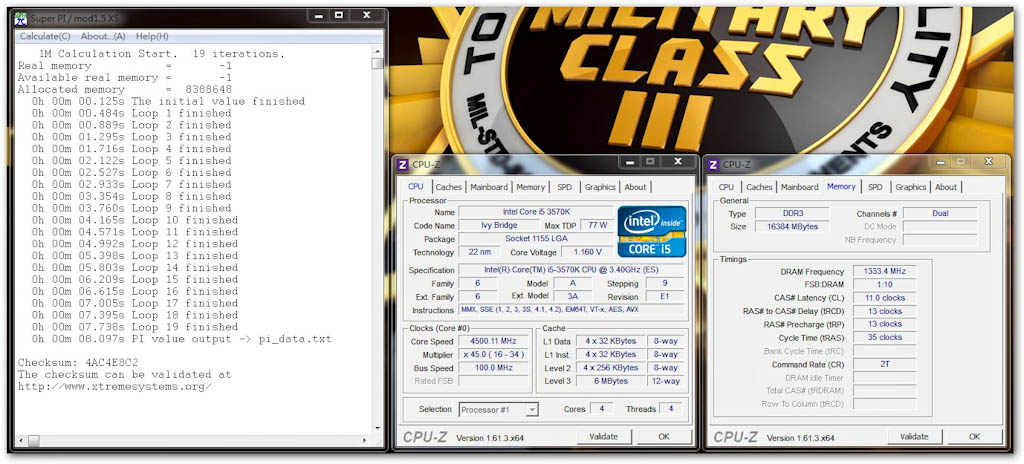
最後手動將CPU設定到4.5G,記憶體則直攻到X.M.P預設的DDR3-2666 CL11-13-13-35,可
以看到SUPERPI測試又進步到8.097秒。
比先前使用OC Genie II 設定的4.22G提升約0.5秒。
http://picx.xfastest.com/japan0827/MPower/46.jpg
記憶體頻寬也進步到讀取24503MB/s,寫入23806MB/s。
http://picx.xfastest.com/japan0827/MPower/47.jpg

總結:
屏除掉過多華而不實的設計,也不將成本花費在幾乎是用不到的一堆配件上,
報價版上Z77 MPower實際查詢到的零售價為6,990元,
對於其他家主機板廠商設計動輒萬元價位的超頻主機板,
這片擁有完整超頻效能的主機板位可算是非常佛心,以往定位於超頻功能的主機板對一
般使用者而言總是較為艱深難懂,Z77 MPower提供多樣的選擇,
即使是不熟悉超頻而想藉由這片主機板體驗超頻功能的朋友
都能相當簡易的操作達到超頻目的,強力推薦給喜愛超頻的電腦玩家們!!!
~END台客兄~
--
~資訊落後打雜機掰台客兄~
--
http://www.xfastest.com/thread-85083-1-1.html
=================================================
INTEL處理器的超頻性能一直是玩家們所津津樂道,各家主機板廠也因應處理卓越的超頻
性能推出不同定位的主機板,
要完全壓榨出i5-3570K、I7-3770K這類不鎖頻處理器的性能,採用Z77晶片的主板當然是
少不了,因此各家知名的主機板廠都會規畫高階超頻系列的Z77主機板,微星在主機板市場經營多
年,累積不少主機板相關技術,在定位超頻領域的主機板自然也少不了這家老字號的廠商
早在先前6月份Computex期間,MSI的展場攤位上就已經悄悄地公布了即將推出全新的Z77
MPower及X79 MPower系列主機板,時間過了一季,Z77 Mpower終於現身,
按照老規矩,當然要先來嘗鮮一下囉!!! 接著來看看Z77 Mpower的完全寫真吧!!
既然是全新的MPower系列,彩盒自然與其他微星自家Z77主板不同。
彩盒右邊OC Certifled字樣,想必當然是為超頻玩家們量身打造的主機板。
http://picx.xfastest.com/japan0827/MPower/1.jpg
彩盒背面除了各項功能的敘述外,就前面OC Certified部分做更完整的敘述,
強調這片主機板經過微星的研究測試,先將CPU超頻至4.6G並使用水冷方式散熱,
接著採用嚴苛的Prime95燒機軟體24小時燒機不間斷,仍能維持穩定且不當機,
足見微星在PWN供電穩壓部份花了不少心思。
http://picx.xfastest.com/japan0827/MPower/2.jpg
由於Z77 MPower主機板的特色及技術相當多,彩盒設計上也採用高階系列產品的包裝方式
在產品說明上比偏向實用性質的主機板更豐富。
http://picx.xfastest.com/japan0827/MPower/3.jpg
上頁主要說明Z77 MPower主機板上導入了DrMOS II技術及各項軍規元件,
除了各項便利超頻玩家們如Debug Led及電壓探測點,另外超頻最重要的供電穩定以及散
熱設計,在在都是為了追求極限超頻而生的。
http://picx.xfastest.com/japan0827/MPower/4.jpg
別於其他品牌主機板的不同,內建BlueTooth藍牙功能,
WiFi無線網路Z77 MPower並沒有為了極限超頻而犧牲掉其他附屬的功能。
http://picx.xfastest.com/japan0827/MPower/5.jpg
各項說明手冊清楚說明主機板功能及光碟片內附的軟體功能,
對於不熟悉超頻的新手們是非常實用的參考工具。
http://picx.xfastest.com/japan0827/MPower/6.jpg
配件部分雖稱不上極為豐富,但該有的一件也不少,除了基本的SATA傳輸線及主機板背板
外,還有無線網路天線及SLI橋接器及便利的前置面板線材轉接座,另外也內附了便利超頻玩
家們接上電壓表探針的線材。
http://picx.xfastest.com/japan0827/MPower/7.jpg
別於以往微星慣用的藍黑配色,採用黑黃配色的Z77 MPower似乎與他牌主機板廠有著一致
的默契,跳脫以往超頻主機板慣用的黑紅機板色調。
http://picx.xfastest.com/japan0827/MPower/8.jpg
Z77 MPower沒有多餘的華麗做工,低調沉穩的全黑配色勾勒黃色的線條帶入了性能元素,
主機板反而顯得更紮實內斂又透露出些許不平凡。
http://picx.xfastest.com/japan0827/MPower/9.jpg
Z77 MPower主機板背面一覽。
http://picx.xfastest.com/japan0827/MPower/10.jpg
16相SFC超導磁電感加上Hi-C CAP鉭質電容及Solid CAP固態電容組成了微星獨家的
MILITARY III 第三代軍規料件,
大型散熱片確保周邊元件在長時間的運作也能維持在穩定的工作溫度。
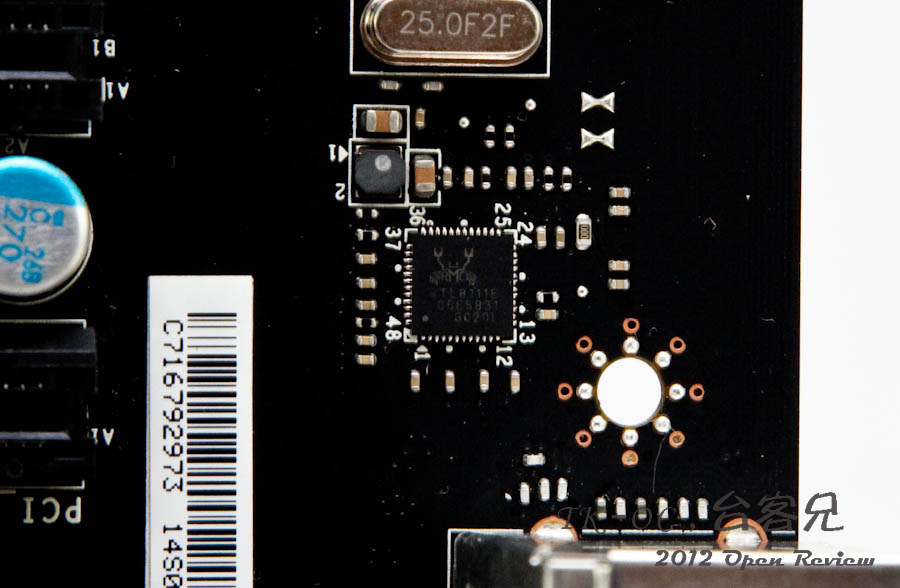
http://picx.xfastest.com/japan0827/MPower/11.jpg
為便利裸測超頻的玩家,主機板上設置了Power & Reset按鍵,
即便是對超頻一竅不通的又想體驗超頻樂趣的朋友,OC Genie II 超頻按鈕按下的立即超
頻功能便利不少使用者。
http://picx.xfastest.com/japan0827/MPower/12.jpg
下方的V-Check Points則提供進階超頻玩家採用三用電表探測CPU VCORE、VTT、DDR及PCH
的電壓點,左側的Debug燈號便利在超頻過程中容易發生不開機的簡易判別指示,
下方與顯示卡6Pin供電相同的電源插座則可以提供顯示卡更穩定的超頻供電。
Z77 MPower在這部分可說是囊括了所有對超頻感興趣的使用者,即便是超頻新手或是進階
玩家,都能在這張主機板上找到符合自己使用的功能。
http://picx.xfastest.com/japan0827/MPower/13.jpg
大型鋁製散熱片協助主機板被動散熱確保穩定工作,Z77 MPower提供Multi BIOS功能,
可透過指撥開關切換避免更新BIOS韌體造成毀損。
http://picx.xfastest.com/japan0827/MPower/14.jpg
由於產品定位不同,Z77 MPower並不如自家如ZA77A-GD80一樣提供四組SATA III Port,
2組SATA3加上4組SATA2共6組SATA Port對於一般日常使用已經相當夠用。
另外轉為90度的USB3.0連接座對於機箱內的線材整理便利不少。
http://picx.xfastest.com/japan0827/MPower/15.jpg
Z77 MPower支援PCI-E GEN3確保最新顯示卡的頻寬不至於降低,另外同時也支援3WAYs
SLI & Cross FireX。
http://picx.xfastest.com/japan0827/MPower/16.jpg
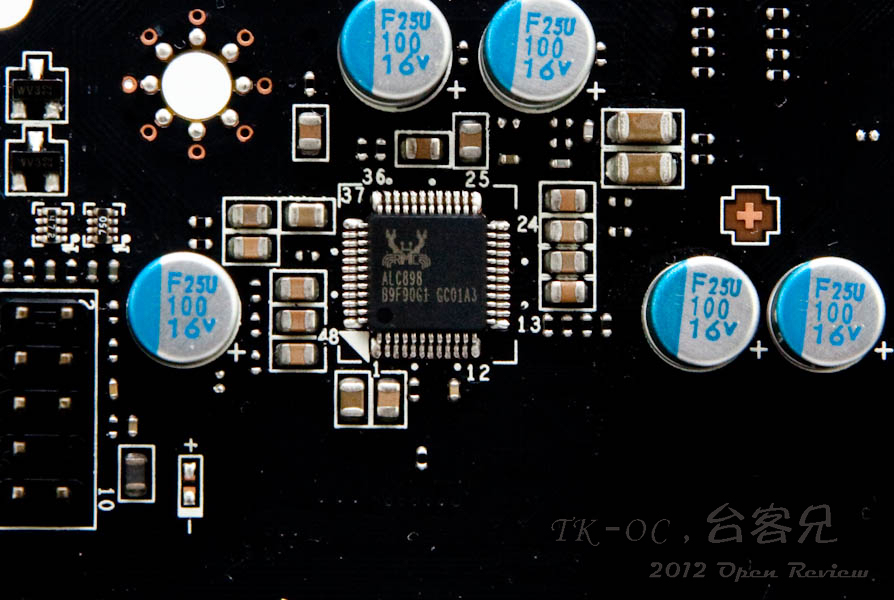
音效晶片採用Realtek ALC 898擁有7.1聲道音效並支援THX TruStudio PRO,提供優秀的
音效體驗。
http://picx.xfastest.com/japan0827/MPower/17.jpg
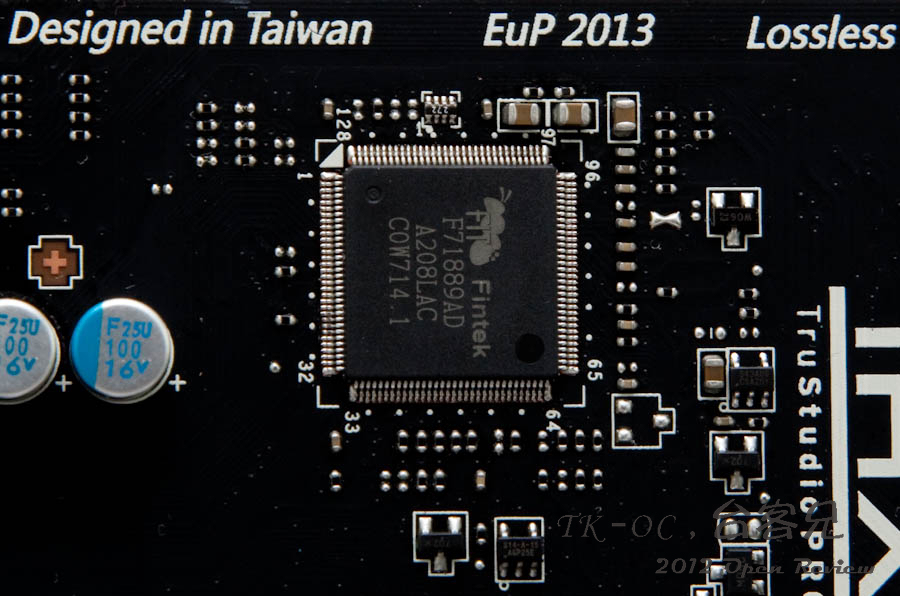
SUPER/IO部分則使用了微星自家慣用的Fintek F71889AD控制晶片。
http://picx.xfastest.com/japan0827/MPower/18.jpg
有線網路部分則為常見的Realtek RTL8111E網路晶片
http://picx.xfastest.com/japan0827/MPower/19.jpg
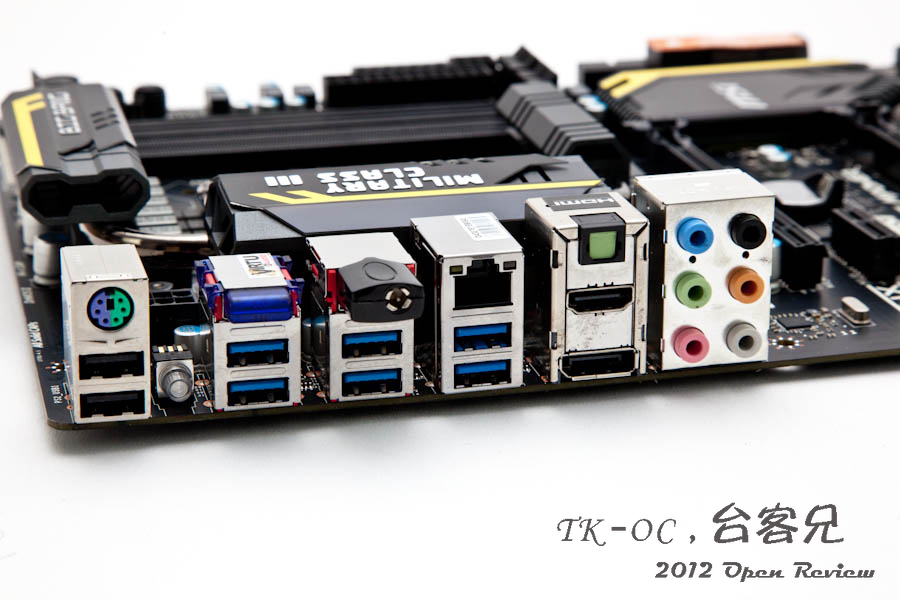
Z77 MPower背板後端支援的連接埠相當豐富,內建了BlueTooth藍芽功能以及WIFI無線網
路提供不少便利性。
http://picx.xfastest.com/japan0827/MPower/20.jpg
前面提到的配件內附短天線,插上主機板也不占空間。
http://picx.xfastest.com/japan0827/MPower/21.jpg
如果主機置放在桌子下方或角落邊難免會影響無線網路的效果,
這時可以改用延長的天線座將天線延伸到桌面上就不會引響訊號傳輸。
http://picx.xfastest.com/japan0827/MPower/22.jpg
消費者的口味被貼心的廠商越養越大了,以前買產品著重效能,
現在除了效能更要產品看起來有FU有爽度才能讓消費者乖乖掏錢出來買單。
微星與AVEXIR宇惟科技在記憶體與主機板搭配上有長久的合作關係,
因此微星在推出Z77 MPower主機板後,AVEXIR也從善如流推出黑黃配色的CORE系列超頻記
憶體,圖中為DDR3-2666 4GB *4共16GB的記憶體。
http://picx.xfastest.com/japan0827/MPower/23.jpg
願意花心思總是會得到辛苦的代價,安插上主機板是不是呈現相當一致的整體感呢!!
為了滿足消費者這些廠商還真的是得花不少苦心啊~
http://picx.xfastest.com/japan0827/MPower/24.jpg
AVEXIR這款記憶體上方是有呼吸指示燈的,可惜手上這組是發藍色的呼吸燈,若是黃色的
呼吸燈號就更加完美囉~
http://picx.xfastest.com/japan0827/MPower/25.jpg
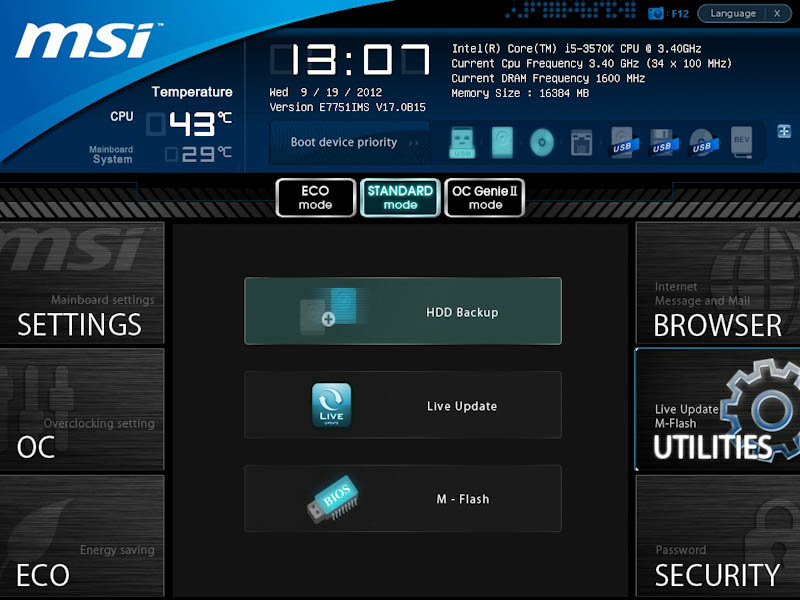
接著來看看MSI UEFI BIOS內容,主頁面選單與先前推出的其他主機板相同,
外觀簡潔一目了然。
http://picx.xfastest.com/japan0827/MPower/26.jpg
各項主機基本功能的開啟與關閉都能在SETTINGS選項裡面找到。
http://picx.xfastest.com/japan0827/MPower/27.jpg
超頻設定自然是Z77 MPower最重要的強項了,可以看到選單裡面有關超頻的設定選項非常
多,
進階超頻高手對於這樣的設定應該會非常滿意。
http://picx.xfastest.com/japan0827/MPower/28.jpg
超頻設定部份下半部主要提供處理器以及記憶體的供電設定。
http://picx.xfastest.com/japan0827/MPower/29.jpg
記憶體部分支援X.M.P是一定要的,像這次搭配AVEXIR 的記憶體測試,
可以看到X.M.P選單中顯示DDR3 2666MHz CL11-13-13-35 1.65V,只要設定為開啟立刻就
會以這個頻率設定運作。
http://picx.xfastest.com/japan0827/MPower/30.jpg
記憶體中的X.M.P選項提供非常清楚的記憶體資訊
http://picx.xfastest.com/japan0827/MPower/34.jpg
BIOS同時也提供6組儲存超頻設定檔功能,還可以將超頻設定存放在USB隨身碟中,
方便寄送給同樣使用Z77MPower的朋友研究使用。
http://picx.xfastest.com/japan0827/MPower/32.jpg
對英文BIOS感到畏懼的朋友也可以改為中文版本,不過說真的,長年使用設定BIOS的習慣
,改成中文反而更看不懂@ @”
http://picx.xfastest.com/japan0827/MPower/35.jpg
UTILITIES的選項中可以讓使用者快速更新主機板的BIOS,只要安裝好網路線,也可線上
更新BIOS資料。
http://picx.xfastest.com/japan0827/MPower/37.jpg
接著直接上機測試看看Z77 MPOWER,下面是這次測試採用的平台
CPU: Intel I7 3570K ES
MB: MSI Z77 MPower
Cooler: Antec KUHLER H2O 920
DRAM: AVERXIR Core Series DDR3-2666 CL11-13-13-35 1.65V
VGA: Lantic HD6670 GDDR5-1G
HD: OCZ VERTEX3 MAX Iops 120G
POWER:Antec HCP-1200W
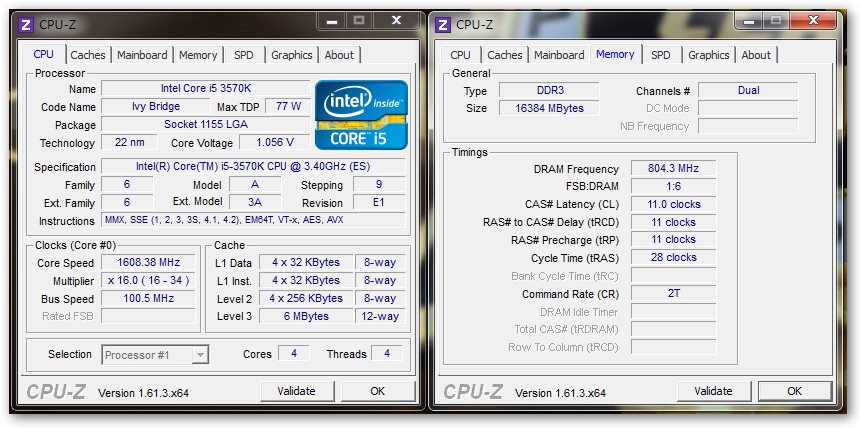
首先先用CPU-Z查看各項設定,CPU部分維持預設頻率,記憶體預設DDR3-1600
CL-11-11-11-28。
http://picx.xfastest.com/japan0827/MPower/39.jpg
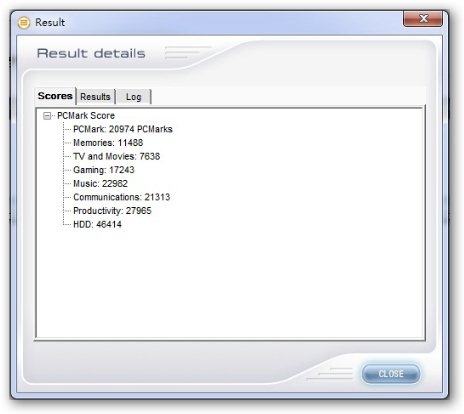
使用PCMark Vantage測試各項分數
http://picx.xfastest.com/japan0827/MPower/40.jpg
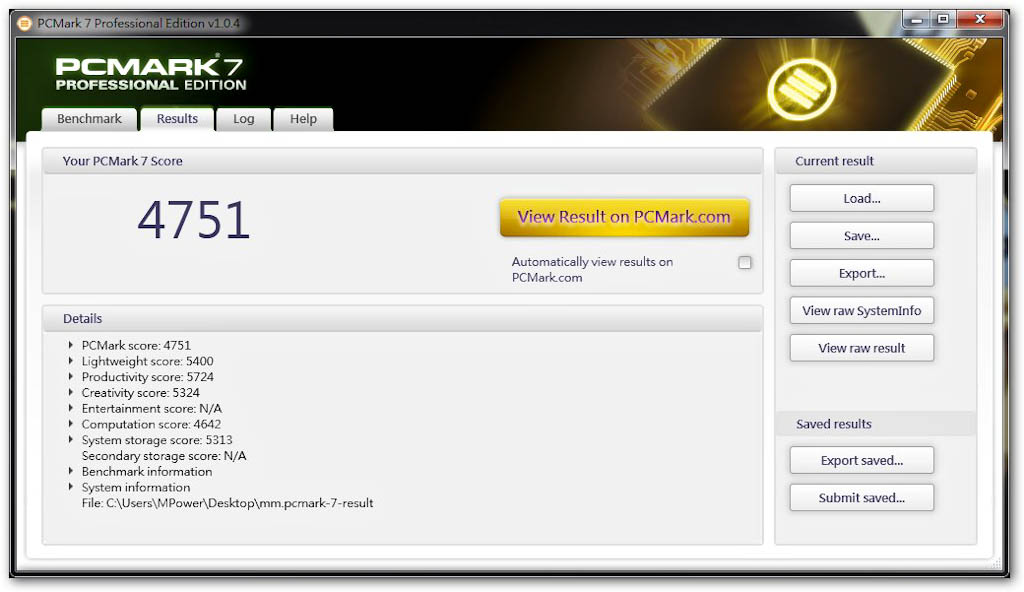
使用PCMark7測試得到4751分
http://picx.xfastest.com/japan0827/MPower/41.jpg
接著使用Super PI測試預設頻率下的處理器運算效能,計算1MB週期時間為9.641秒。
http://picx.xfastest.com/japan0827/MPower/42.jpg
使用AIDA64測試DDR3-1600的記憶體頻寬,讀取部分達18226MB/s,寫入則有19324MB/s。
http://picx.xfastest.com/japan0827/MPower/43.jpg
懶得手動超頻或是不熟悉超頻的朋友,按下機板上的OC Genie II 一鍵超頻功能,
主機板馬上會自動超頻解決設定的麻煩,可以看到當按下按鈕後,
處理器已經自動超頻到4.22G,記憶體也跑到DDR3-2144 CL11-13-13-35,
同樣使用SUPER PI測試,計算時間進步到8.674秒。進步接近一秒。
http://picx.xfastest.com/japan0827/MPower/44.jpg
AIDA64測試DDR3-2144的記憶體頻寬,讀取部分提升達22140MB/s,寫入則有21924MB/s。
http://picx.xfastest.com/japan0827/MPower/45.jpg
最後手動將CPU設定到4.5G,記憶體則直攻到X.M.P預設的DDR3-2666 CL11-13-13-35,可
以看到SUPERPI測試又進步到8.097秒。
比先前使用OC Genie II 設定的4.22G提升約0.5秒。
http://picx.xfastest.com/japan0827/MPower/46.jpg
記憶體頻寬也進步到讀取24503MB/s,寫入23806MB/s。
http://picx.xfastest.com/japan0827/MPower/47.jpg
總結:
屏除掉過多華而不實的設計,也不將成本花費在幾乎是用不到的一堆配件上,
報價版上Z77 MPower實際查詢到的零售價為6,990元,
對於其他家主機板廠商設計動輒萬元價位的超頻主機板,
這片擁有完整超頻效能的主機板位可算是非常佛心,以往定位於超頻功能的主機板對一
般使用者而言總是較為艱深難懂,Z77 MPower提供多樣的選擇,
即使是不熟悉超頻而想藉由這片主機板體驗超頻功能的朋友
都能相當簡易的操作達到超頻目的,強力推薦給喜愛超頻的電腦玩家們!!!
~END台客兄~
--
~資訊落後打雜機掰台客兄~
--
All Comments