技嘉 Gigabyte Z370 Aorus Gaming 3 - 3C
By Linda
at 2017-12-06T15:46
at 2017-12-06T15:46
Table of Contents
有 BIOS Screen Shot 的 Blog Ver.
http://shadowsfalltw.gjisland.net/blog/?p=8228
--
有如 ROG 之於 ASUS,技嘉自身也有專精於遊戲取向的高階支線 Aorus,但在此之前技嘉
也有 G1 Gaming、Xtreme Gaming 等類似名稱做相同事情的各種遊戲導向的產品家族,一
時之間也是令消費者捉摸不清。不過大約是從今年開始,技嘉開始逐步整合多所歧異的型
號,收合至 Aorus 品牌之下,可以先看到在 2017 年前半主機板型號中還是會有一些非
Aorus 的 Gaming 板,不過隨著 Coffee Lake 平台的發布,可以看到產品的 lineup 就
變得整齊許多,Aorus 就是技嘉的 gaming 品牌的這個概念正式定調。
在 Coffee Lake 平台上,最大的變化是幾乎所有階層的 CPU 都增加了 2cores ,由於架
構優化越來越困難,因此有效提升性能的做法就是追加核心,雖然這個規劃跟 AMD 的
Ryzen 推出其實沒有什麼太大關係,但其實 Ryzen 的發布也多少是讓 intel 抖了一下
,導致發布時間表變得有點混亂。而作為 Kaby Lake 的優化,PCH 部分是可以部份共用
的,首發的 Z370 PCH 也與 Z270 PCH 基本上相同,但因為增加的 CPU Core 可能帶來的
更多耗電,對應了這樣的變化,3系列主板在 CPU Pinout 上,會挪用一部分 reserved
腳位額外給電,為了進一步防止安裝在舊主板上可能意外產生的性能低落等不預期的問題
,Intel 也在 ME 內進行鎖定。
產品外箱:Aorus 鷹頭的形象導入其中。
http://shadowsfalltw.gjisland.net/pic/gbz370aorusg3/gbaorusz370g3_01.JPG
 http://shadowsfalltw.gjisland.net/pic/gbz370aorusg3/gbaorusz370g3_02.JPG

配件一覽:
http://shadowsfalltw.gjisland.net/pic/gbz370aorusg3/gbaorusz370g3_03.JPG

本體一覽:視覺上還是採紅黑配,主板的設計也是一眼就可以看出來是技嘉的手筆。
http://shadowsfalltw.gjisland.net/pic/gbz370aorusg3/gbaorusz370g3_04.JPG
 http://shadowsfalltw.gjisland.net/pic/gbz370aorusg3/gbaorusz370g3_05.JPG

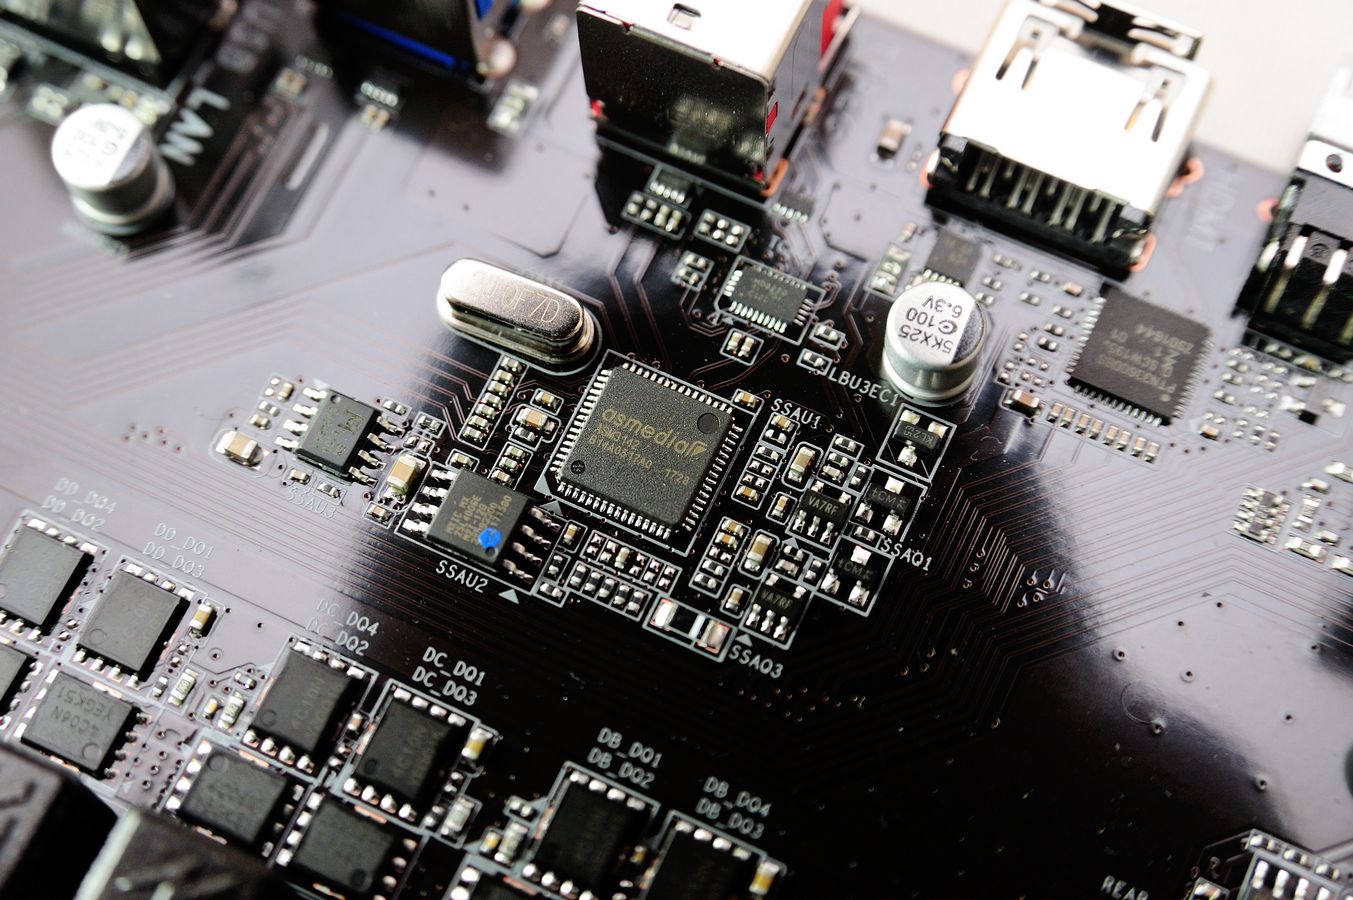
背板 IO 區塊:提供了 USB 3.1 Type-C,視訊輸出僅搭載 HDMI。對應機能的晶片則是有
ASM2142、TI HD3SS3220 CC logic 控制晶片、LDO 等組合而成的 USB3.1 區塊,以及
NXP PTN3360 Level Shifter,提供 HDMI 1.4b 視訊規範,依然未採用支援 HDMI 2.0
的 Level shifter。
http://shadowsfalltw.gjisland.net/pic/gbz370aorusg3/gbaorusz370g3_06.JPG
 http://shadowsfalltw.gjisland.net/pic/gbz370aorusg3/gbaorusz370g3_07.JPG
 http://shadowsfalltw.gjisland.net/pic/gbz370aorusg3/gbaorusz370g3_08.JPG
 http://shadowsfalltw.gjisland.net/pic/gbz370aorusg3/gbaorusz370g3_09.JPG

VRM區一覽:兩塊分離的散熱片覆蓋,控制器使用ISL95866 4+3 相控制器,IA Phase 為
四相2H2L、GT 3相1H1L;VRM MOSFET 使用 ON Semi NTMFS4C10N、NTMFS4C06N 組成;電
容則是清一色使用 APAQ 的固態電容。整體的設計延用 200 世代的配置。
http://shadowsfalltw.gjisland.net/pic/gbz370aorusg3/gbaorusz370g3_10.JPG
 http://shadowsfalltw.gjisland.net/pic/gbz370aorusg3/gbaorusz370g3_11.JPG
 http://shadowsfalltw.gjisland.net/pic/gbz370aorusg3/gbaorusz370g3_12.JPG
 http://shadowsfalltw.gjisland.net/pic/gbz370aorusg3/gbaorusz370g3_13.JPG

Fan driver 使用 Nuvoton 3947S:
http://shadowsfalltw.gjisland.net/pic/gbz370aorusg3/gbaorusz370g3_14.JPG

DRAM VRM部分則是使用 RT8120 搭配 ON Semi NTMFS4C06N,1H2L:
http://shadowsfalltw.gjisland.net/pic/gbz370aorusg3/gbaorusz370g3_15.JPG

RGB 接頭部分,Z370 Aorus Gaming 3 搭載了兩種形式的接頭,一種是傳統的4線式 PWM
控制,技嘉自行再追加白光控制信號;另一種則是直接使用單一信號給燈條控制器的三線
式控制,三線控制可以另外選擇 LED 驅動的電壓為 5V 或 12V。
http://shadowsfalltw.gjisland.net/pic/gbz370aorusg3/gbaorusz370g3_16.JPG

USB Header 除了 USB 3.0以外,也導入了供 3.1 Type C 專用的新規範 header,左側則
是能看到 Thunderbolt 用的 AIC header :
http://shadowsfalltw.gjisland.net/pic/gbz370aorusg3/gbaorusz370g3_17.JPG

SATA 與低速 IO 區塊:另外仔細一看技嘉也 PCH 散熱片上做了一些細節上的處理。
http://shadowsfalltw.gjisland.net/pic/gbz370aorusg3/gbaorusz370g3_18.JPG

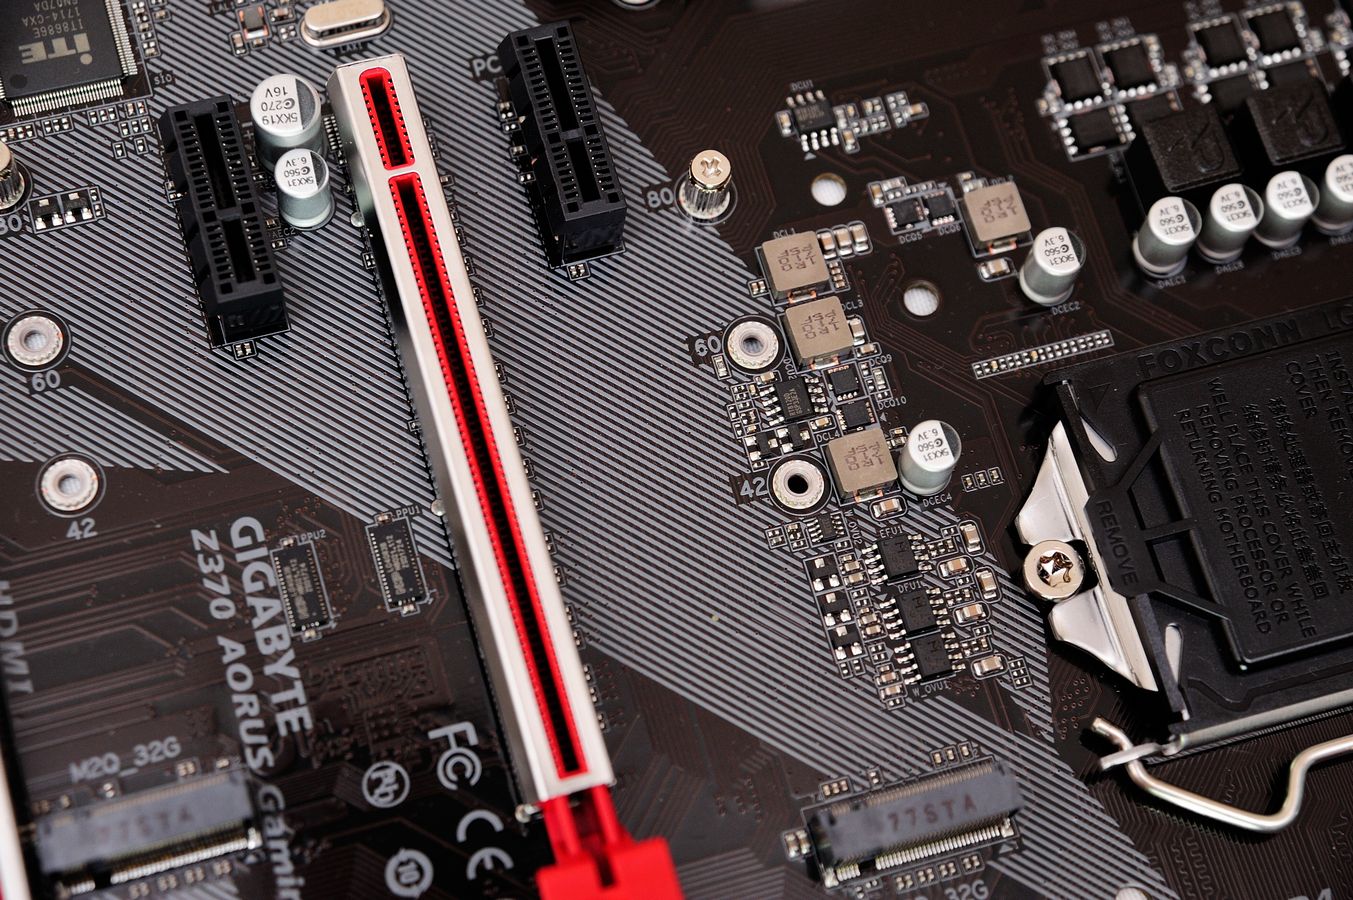
PCIe Slot 區塊:配置了兩條 M.2,上方支援 SATA/PCIe 雙規,這點可以從叫多的 VRM
配置看出,下方的則是 PCIe Only。另外兩條具有金屬遮蔽的 PCIe X16 插槽其中一條因
為分配規劃的關係,只支援到 X4 並且與下方其他 PCIe X1 共用頻寬,配置很多封閉式
PCIe X1 又與一條 X16 槽共享頻寬的做法到是有點少見。
http://shadowsfalltw.gjisland.net/pic/gbz370aorusg3/gbaorusz370g3_19.JPG
 http://shadowsfalltw.gjisland.net/pic/gbz370aorusg3/gbaorusz370g3_20.JPG

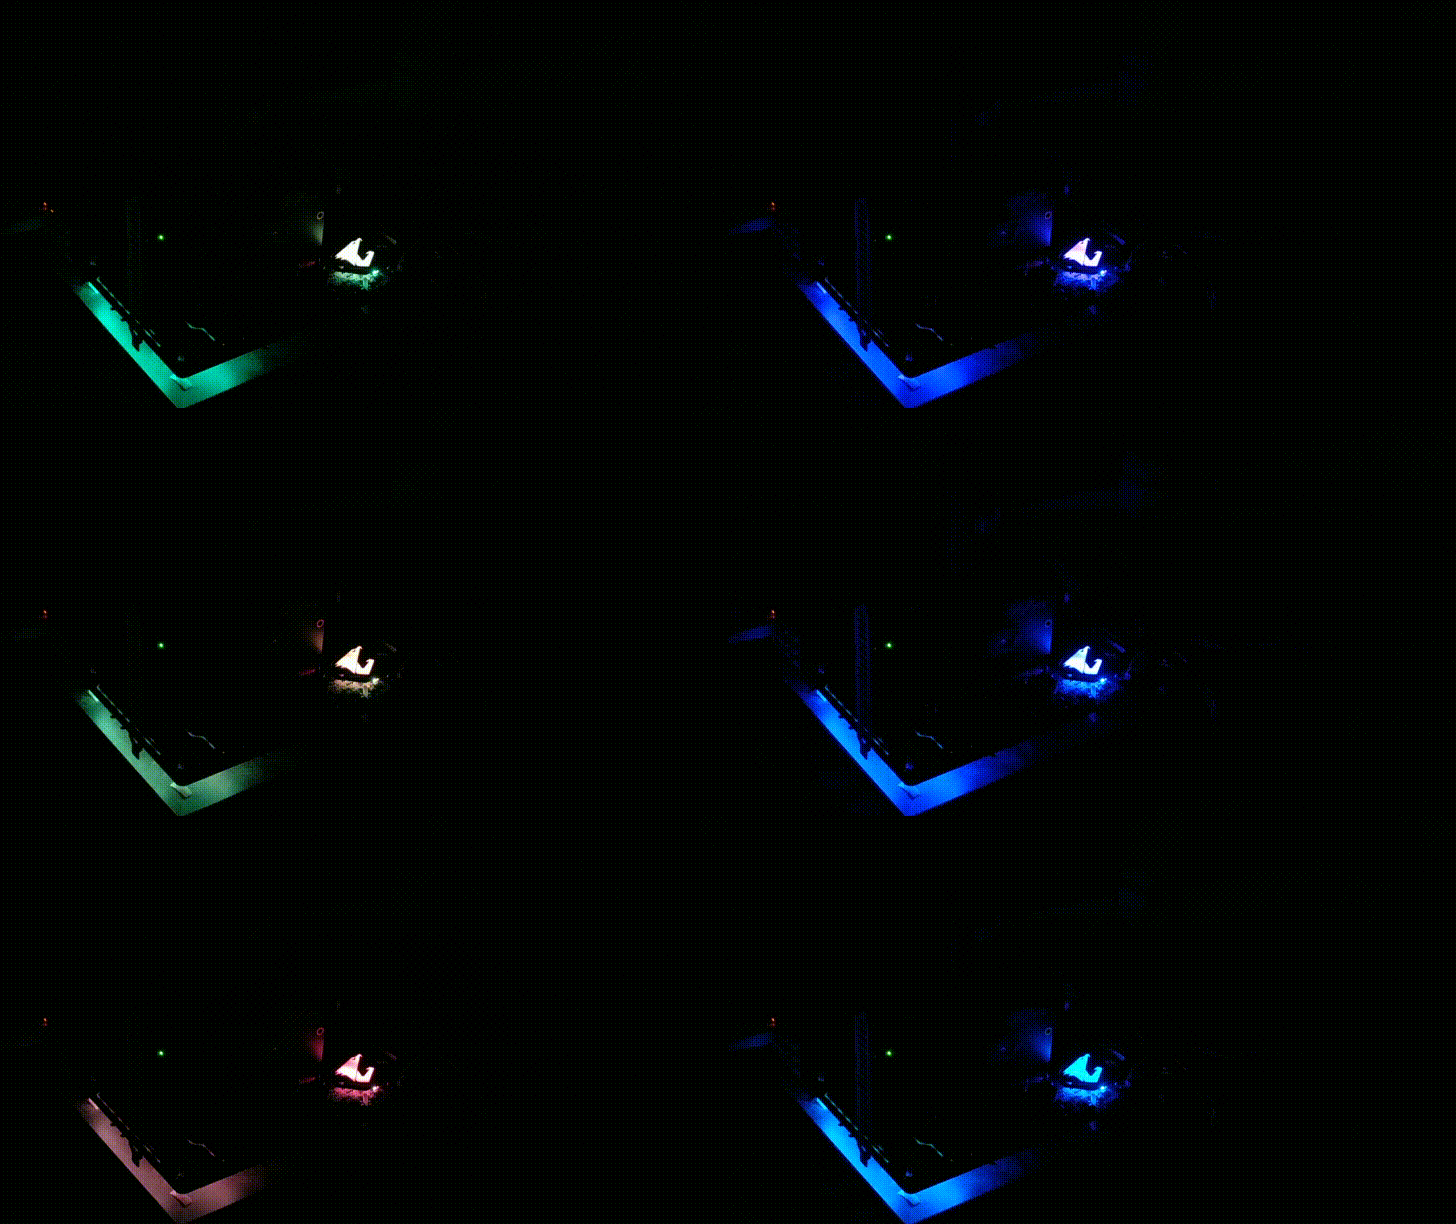
PCH 旁則是埋有支援RGB發光的 LED 燈,與散熱片上的透光飾板提供發光效果:
http://shadowsfalltw.gjisland.net/pic/gbz370aorusg3/gbaorusz370g3_21.JPG

下方同樣有一組 RGB 燈條接頭,推展 RGB 發光不遺餘力:
http://shadowsfalltw.gjisland.net/pic/gbz370aorusg3/gbaorusz370g3_22.JPG

控制 LED 發光用的 MCU 使用了 iTE 的 IT8295FN:
http://shadowsfalltw.gjisland.net/pic/gbz370aorusg3/gbaorusz370g3_23.JPG

Codec 同樣金屬遮罩加上地線割線,電容交聯的部分則是同樣使用 Nichicon 電容,較特
別的是加入了 4 顆 WIMA 薄膜電容,量測後可得一部分作為 bypass cap ,另一部分則
是交聯調音使用:
http://shadowsfalltw.gjisland.net/pic/gbz370aorusg3/gbaorusz370g3_24.JPG

Super IO 使用 iTE IT8686E,旁邊則是 Killer E2500 Lan PHY
http://shadowsfalltw.gjisland.net/pic/gbz370aorusg3/gbaorusz370g3_25.JPG
 http://shadowsfalltw.gjisland.net/pic/gbz370aorusg3/gbaorusz370g3_26.JPG

首次開機:燈光效果為紅色單色,發光區域包含 PCH 散熱片、Codec 割線。不過比起之
前的 H270 Gaming 3,發光導光飾條都沒有配置,少了一點特色
http://shadowsfalltw.gjisland.net/pic/gbz370aorusg3/gbaorusz370g3_27.JPG

BIOS 部分:整體的UI 還是清晰好讀、需要圖形化調整的介面大小也是恰如其分,也能夠
顯示足夠多的資訊,功能的輔助說明。在 BIOS 內也能夠進行 RGB LED 的調整。但
BIOS 的選項在安排上還是過於鬆散,選項可以集中不需要做過多的分類,另外也缺乏目
前 BIOS 所在階層的提示,算是 BIOS 比較美中不足的部分。這問題在早先的 H270 同樣
存在,大概系出同源的 Z370 也是就這樣定案了。
軟體部分,使用者同樣先安裝 App Center 這個 portal APP 內,整體沒有太大變化,依
然是方便使用的。當然大小、捲軸等問題也還待改進。
http://shadowsfalltw.gjisland.net/pic/gbz370aorusg3/appc_01.JPG
 http://shadowsfalltw.gjisland.net/pic/gbz370aorusg3/appc_02.JPG
 http://shadowsfalltw.gjisland.net/pic/gbz370aorusg3/appc_03.JPG

RGB Fusion 部分,Aorus 版本的 UI 有點不同,變得較為緊湊一點,功能性上更強,除
了原先的燈條、主板分離顯色以外,主板上兩個區塊也能夠各自指定效果與色彩,新導入
的數位燈條也已經提供相當詳盡的調整機能,整合其他周邊調整的設定似乎也基本上到位
,等待協力廠或是技嘉自家周邊加入整合,讓調整的彈性更多。
http://shadowsfalltw.gjisland.net/pic/gbz370aorusg3/rgbf_01.JPG
 http://shadowsfalltw.gjisland.net/pic/gbz370aorusg3/rgbf_02.JPG
 http://shadowsfalltw.gjisland.net/pic/gbz370aorusg3/rgbf_03.JPG
 http://shadowsfalltw.gjisland.net/pic/gbz370aorusg3/rgbf_04.JPG
 http://shadowsfalltw.gjisland.net/pic/gbz370aorusg3/rgbf_05.JPG
 http://shadowsfalltw.gjisland.net/pic/gbz370aorusg3/rgbf_06.JPG

http://shadowsfalltw.gjisland.net/pic/gbz370aorusg3/gbaorusz370g3_28.JPG

呼吸:
http://shadowsfalltw.gjisland.net/pic/gbz370aorusg3/rgb_breath.gif

音樂:
http://shadowsfalltw.gjisland.net/pic/gbz370aorusg3/rgb_music.gif

自動:
http://shadowsfalltw.gjisland.net/pic/gbz370aorusg3/rgb_auto.gif

閃爍:
http://shadowsfalltw.gjisland.net/pic/gbz370aorusg3/rgb_blink.gif

隨機:
http://shadowsfalltw.gjisland.net/pic/gbz370aorusg3/rgb_random.gif

雙閃:
http://shadowsfalltw.gjisland.net/pic/gbz370aorusg3/rgb_dual.gif

示範:
http://shadowsfalltw.gjisland.net/pic/gbz370aorusg3/rgb_demo.gif

接下來簡單測試整體性能,測試平台資料:
http://shadowsfalltw.gjisland.net/pic/gbz370aorusg3/sys.JPG

Cinebench:
http://shadowsfalltw.gjisland.net/pic/gbz370aorusg3/ciner11.JPG
 http://shadowsfalltw.gjisland.net/pic/gbz370aorusg3/ciner15.JPG

PCMARK 7:
http://shadowsfalltw.gjisland.net/pic/gbz370aorusg3/PCMARK7.JPG

PCMARK 8:
http://shadowsfalltw.gjisland.net/pic/gbz370aorusg3/pcm8crec.JPG
 http://shadowsfalltw.gjisland.net/pic/gbz370aorusg3/pcm8homec.JPG
 http://shadowsfalltw.gjisland.net/pic/gbz370aorusg3/pcm8workc.JPG

PCMARK 10:
http://shadowsfalltw.gjisland.net/pic/gbz370aorusg3/pcm10.JPG
 http://shadowsfalltw.gjisland.net/pic/gbz370aorusg3/pcm10xtend.JPG

GeekBench:
http://shadowsfalltw.gjisland.net/pic/gbz370aorusg3/geek.JPG
 http://shadowsfalltw.gjisland.net/pic/gbz370aorusg3/geekocl.JPG

HWBOT Prime Benchmark:
http://shadowsfalltw.gjisland.net/pic/gbz370aorusg3/hwprime.JPG

HWBOT X265 Benchmark:
http://shadowsfalltw.gjisland.net/pic/gbz370aorusg3/x265bench.JPG

Intel XTU:
http://shadowsfalltw.gjisland.net/pic/gbz370aorusg3/XTU.JPG

Passmark Performance Test:
http://shadowsfalltw.gjisland.net/pic/gbz370aorusg3/paspt.JPG

其實 Gaming 3 這個階層定位已經存在,加上了 Z370 與 200 系列的關係,所以和
H270 Gaming 3 相比,很多部分都是相當雷同的,在用料程度都還是可以預期的,電路
架構也有著相當的熟悉感。當然對應了 Z370 的可超頻性以及額外的 core count,在
VRM 上有額外的小補強了一下,增加 Vcore 的電流供應能力,整體之下在用料等級上也
是不過不失,電路用料上還算是相當符合身價、恰如其分的,另外音效的交聯與供電旁路
也同時用上了燒料也是比較特別的部分。RGB Fusion 變得更有控制彈性也是值得讚賞。
不過用料上雖然沒甚麼問題,但之前在 H270 Gaming 3 的導光飾條在這一波的的 Z370
主板發售卻要到 Gaming 5 層級上才有配置,實在是有點可惜,比起多組 LED 燈條的
header,個人還是比較想要 Ram Slot 的導光飾條;過多的 PCIe X1 插槽配置方式數量
也是令人不解,已經有兩條 M.2 留下的空間,加上一堆封閉式 X1 Slot 讓下方過度空曠
看起來反倒有些頭重腳輕的不平衡感,實用上也不如友商使用 open slot 的方式來的方
便。
http://shadowsfalltw.gjisland.net/pic/gbz370aorusg3/gbaorusz370g3_29.JPG

--
用料上合理,視覺、配置有點微妙
--
http://shadowsfalltw.gjisland.net/blog/?p=8228
--
有如 ROG 之於 ASUS,技嘉自身也有專精於遊戲取向的高階支線 Aorus,但在此之前技嘉
也有 G1 Gaming、Xtreme Gaming 等類似名稱做相同事情的各種遊戲導向的產品家族,一
時之間也是令消費者捉摸不清。不過大約是從今年開始,技嘉開始逐步整合多所歧異的型
號,收合至 Aorus 品牌之下,可以先看到在 2017 年前半主機板型號中還是會有一些非
Aorus 的 Gaming 板,不過隨著 Coffee Lake 平台的發布,可以看到產品的 lineup 就
變得整齊許多,Aorus 就是技嘉的 gaming 品牌的這個概念正式定調。
在 Coffee Lake 平台上,最大的變化是幾乎所有階層的 CPU 都增加了 2cores ,由於架
構優化越來越困難,因此有效提升性能的做法就是追加核心,雖然這個規劃跟 AMD 的
Ryzen 推出其實沒有什麼太大關係,但其實 Ryzen 的發布也多少是讓 intel 抖了一下
,導致發布時間表變得有點混亂。而作為 Kaby Lake 的優化,PCH 部分是可以部份共用
的,首發的 Z370 PCH 也與 Z270 PCH 基本上相同,但因為增加的 CPU Core 可能帶來的
更多耗電,對應了這樣的變化,3系列主板在 CPU Pinout 上,會挪用一部分 reserved
腳位額外給電,為了進一步防止安裝在舊主板上可能意外產生的性能低落等不預期的問題
,Intel 也在 ME 內進行鎖定。
產品外箱:Aorus 鷹頭的形象導入其中。
http://shadowsfalltw.gjisland.net/pic/gbz370aorusg3/gbaorusz370g3_01.JPG
配件一覽:
http://shadowsfalltw.gjisland.net/pic/gbz370aorusg3/gbaorusz370g3_03.JPG
本體一覽:視覺上還是採紅黑配,主板的設計也是一眼就可以看出來是技嘉的手筆。
http://shadowsfalltw.gjisland.net/pic/gbz370aorusg3/gbaorusz370g3_04.JPG
背板 IO 區塊:提供了 USB 3.1 Type-C,視訊輸出僅搭載 HDMI。對應機能的晶片則是有
ASM2142、TI HD3SS3220 CC logic 控制晶片、LDO 等組合而成的 USB3.1 區塊,以及
NXP PTN3360 Level Shifter,提供 HDMI 1.4b 視訊規範,依然未採用支援 HDMI 2.0
的 Level shifter。
http://shadowsfalltw.gjisland.net/pic/gbz370aorusg3/gbaorusz370g3_06.JPG
VRM區一覽:兩塊分離的散熱片覆蓋,控制器使用ISL95866 4+3 相控制器,IA Phase 為
四相2H2L、GT 3相1H1L;VRM MOSFET 使用 ON Semi NTMFS4C10N、NTMFS4C06N 組成;電
容則是清一色使用 APAQ 的固態電容。整體的設計延用 200 世代的配置。
http://shadowsfalltw.gjisland.net/pic/gbz370aorusg3/gbaorusz370g3_10.JPG
Fan driver 使用 Nuvoton 3947S:
http://shadowsfalltw.gjisland.net/pic/gbz370aorusg3/gbaorusz370g3_14.JPG
DRAM VRM部分則是使用 RT8120 搭配 ON Semi NTMFS4C06N,1H2L:
http://shadowsfalltw.gjisland.net/pic/gbz370aorusg3/gbaorusz370g3_15.JPG
RGB 接頭部分,Z370 Aorus Gaming 3 搭載了兩種形式的接頭,一種是傳統的4線式 PWM
控制,技嘉自行再追加白光控制信號;另一種則是直接使用單一信號給燈條控制器的三線
式控制,三線控制可以另外選擇 LED 驅動的電壓為 5V 或 12V。
http://shadowsfalltw.gjisland.net/pic/gbz370aorusg3/gbaorusz370g3_16.JPG
USB Header 除了 USB 3.0以外,也導入了供 3.1 Type C 專用的新規範 header,左側則
是能看到 Thunderbolt 用的 AIC header :
http://shadowsfalltw.gjisland.net/pic/gbz370aorusg3/gbaorusz370g3_17.JPG
SATA 與低速 IO 區塊:另外仔細一看技嘉也 PCH 散熱片上做了一些細節上的處理。
http://shadowsfalltw.gjisland.net/pic/gbz370aorusg3/gbaorusz370g3_18.JPG
PCIe Slot 區塊:配置了兩條 M.2,上方支援 SATA/PCIe 雙規,這點可以從叫多的 VRM
配置看出,下方的則是 PCIe Only。另外兩條具有金屬遮蔽的 PCIe X16 插槽其中一條因
為分配規劃的關係,只支援到 X4 並且與下方其他 PCIe X1 共用頻寬,配置很多封閉式
PCIe X1 又與一條 X16 槽共享頻寬的做法到是有點少見。
http://shadowsfalltw.gjisland.net/pic/gbz370aorusg3/gbaorusz370g3_19.JPG
PCH 旁則是埋有支援RGB發光的 LED 燈,與散熱片上的透光飾板提供發光效果:
http://shadowsfalltw.gjisland.net/pic/gbz370aorusg3/gbaorusz370g3_21.JPG
下方同樣有一組 RGB 燈條接頭,推展 RGB 發光不遺餘力:
http://shadowsfalltw.gjisland.net/pic/gbz370aorusg3/gbaorusz370g3_22.JPG
控制 LED 發光用的 MCU 使用了 iTE 的 IT8295FN:
http://shadowsfalltw.gjisland.net/pic/gbz370aorusg3/gbaorusz370g3_23.JPG
Codec 同樣金屬遮罩加上地線割線,電容交聯的部分則是同樣使用 Nichicon 電容,較特
別的是加入了 4 顆 WIMA 薄膜電容,量測後可得一部分作為 bypass cap ,另一部分則
是交聯調音使用:
http://shadowsfalltw.gjisland.net/pic/gbz370aorusg3/gbaorusz370g3_24.JPG
Super IO 使用 iTE IT8686E,旁邊則是 Killer E2500 Lan PHY
http://shadowsfalltw.gjisland.net/pic/gbz370aorusg3/gbaorusz370g3_25.JPG
首次開機:燈光效果為紅色單色,發光區域包含 PCH 散熱片、Codec 割線。不過比起之
前的 H270 Gaming 3,發光導光飾條都沒有配置,少了一點特色
http://shadowsfalltw.gjisland.net/pic/gbz370aorusg3/gbaorusz370g3_27.JPG
BIOS 部分:整體的UI 還是清晰好讀、需要圖形化調整的介面大小也是恰如其分,也能夠
顯示足夠多的資訊,功能的輔助說明。在 BIOS 內也能夠進行 RGB LED 的調整。但
BIOS 的選項在安排上還是過於鬆散,選項可以集中不需要做過多的分類,另外也缺乏目
前 BIOS 所在階層的提示,算是 BIOS 比較美中不足的部分。這問題在早先的 H270 同樣
存在,大概系出同源的 Z370 也是就這樣定案了。
軟體部分,使用者同樣先安裝 App Center 這個 portal APP 內,整體沒有太大變化,依
然是方便使用的。當然大小、捲軸等問題也還待改進。
http://shadowsfalltw.gjisland.net/pic/gbz370aorusg3/appc_01.JPG
RGB Fusion 部分,Aorus 版本的 UI 有點不同,變得較為緊湊一點,功能性上更強,除
了原先的燈條、主板分離顯色以外,主板上兩個區塊也能夠各自指定效果與色彩,新導入
的數位燈條也已經提供相當詳盡的調整機能,整合其他周邊調整的設定似乎也基本上到位
,等待協力廠或是技嘉自家周邊加入整合,讓調整的彈性更多。
http://shadowsfalltw.gjisland.net/pic/gbz370aorusg3/rgbf_01.JPG
http://shadowsfalltw.gjisland.net/pic/gbz370aorusg3/gbaorusz370g3_28.JPG
呼吸:
http://shadowsfalltw.gjisland.net/pic/gbz370aorusg3/rgb_breath.gif

音樂:
http://shadowsfalltw.gjisland.net/pic/gbz370aorusg3/rgb_music.gif

自動:
http://shadowsfalltw.gjisland.net/pic/gbz370aorusg3/rgb_auto.gif

閃爍:
http://shadowsfalltw.gjisland.net/pic/gbz370aorusg3/rgb_blink.gif

隨機:
http://shadowsfalltw.gjisland.net/pic/gbz370aorusg3/rgb_random.gif

雙閃:
http://shadowsfalltw.gjisland.net/pic/gbz370aorusg3/rgb_dual.gif

示範:
http://shadowsfalltw.gjisland.net/pic/gbz370aorusg3/rgb_demo.gif

接下來簡單測試整體性能,測試平台資料:
http://shadowsfalltw.gjisland.net/pic/gbz370aorusg3/sys.JPG
Cinebench:
http://shadowsfalltw.gjisland.net/pic/gbz370aorusg3/ciner11.JPG
PCMARK 7:
http://shadowsfalltw.gjisland.net/pic/gbz370aorusg3/PCMARK7.JPG
PCMARK 8:
http://shadowsfalltw.gjisland.net/pic/gbz370aorusg3/pcm8crec.JPG
PCMARK 10:
http://shadowsfalltw.gjisland.net/pic/gbz370aorusg3/pcm10.JPG
GeekBench:
http://shadowsfalltw.gjisland.net/pic/gbz370aorusg3/geek.JPG
HWBOT Prime Benchmark:
http://shadowsfalltw.gjisland.net/pic/gbz370aorusg3/hwprime.JPG
HWBOT X265 Benchmark:
http://shadowsfalltw.gjisland.net/pic/gbz370aorusg3/x265bench.JPG
Intel XTU:
http://shadowsfalltw.gjisland.net/pic/gbz370aorusg3/XTU.JPG
Passmark Performance Test:
http://shadowsfalltw.gjisland.net/pic/gbz370aorusg3/paspt.JPG
其實 Gaming 3 這個階層定位已經存在,加上了 Z370 與 200 系列的關係,所以和
H270 Gaming 3 相比,很多部分都是相當雷同的,在用料程度都還是可以預期的,電路
架構也有著相當的熟悉感。當然對應了 Z370 的可超頻性以及額外的 core count,在
VRM 上有額外的小補強了一下,增加 Vcore 的電流供應能力,整體之下在用料等級上也
是不過不失,電路用料上還算是相當符合身價、恰如其分的,另外音效的交聯與供電旁路
也同時用上了燒料也是比較特別的部分。RGB Fusion 變得更有控制彈性也是值得讚賞。
不過用料上雖然沒甚麼問題,但之前在 H270 Gaming 3 的導光飾條在這一波的的 Z370
主板發售卻要到 Gaming 5 層級上才有配置,實在是有點可惜,比起多組 LED 燈條的
header,個人還是比較想要 Ram Slot 的導光飾條;過多的 PCIe X1 插槽配置方式數量
也是令人不解,已經有兩條 M.2 留下的空間,加上一堆封閉式 X1 Slot 讓下方過度空曠
看起來反倒有些頭重腳輕的不平衡感,實用上也不如友商使用 open slot 的方式來的方
便。
http://shadowsfalltw.gjisland.net/pic/gbz370aorusg3/gbaorusz370g3_29.JPG
--
用料上合理,視覺、配置有點微妙
--
Tags:
3C
All Comments
By Ivy
at 2017-12-06T20:49
at 2017-12-06T20:49
By Doris
at 2017-12-10T20:23
at 2017-12-10T20:23
By Daniel
at 2017-12-12T05:42
at 2017-12-12T05:42
By Doris
at 2017-12-15T11:45
at 2017-12-15T11:45
By Cara
at 2017-12-16T05:05
at 2017-12-16T05:05
By George
at 2017-12-17T01:21
at 2017-12-17T01:21
By Jake
at 2017-12-17T11:51
at 2017-12-17T11:51
By Dora
at 2017-12-22T06:03
at 2017-12-22T06:03
By Hedy
at 2017-12-25T09:20
at 2017-12-25T09:20
By Gary
at 2017-12-29T12:25
at 2017-12-29T12:25
By Caroline
at 2018-01-03T03:32
at 2018-01-03T03:32
By Joe
at 2018-01-08T02:48
at 2018-01-08T02:48
By Adele
at 2018-01-12T22:01
at 2018-01-12T22:01
By Edwina
at 2018-01-15T14:01
at 2018-01-15T14:01
By Yuri
at 2018-01-18T22:17
at 2018-01-18T22:17
By Tristan Cohan
at 2018-01-21T16:15
at 2018-01-21T16:15
By Linda
at 2018-01-23T21:30
at 2018-01-23T21:30
By Joe
at 2018-01-28T12:20
at 2018-01-28T12:20
By Yuri
at 2018-01-31T18:15
at 2018-01-31T18:15
By Freda
at 2018-02-01T09:35
at 2018-02-01T09:35
By Heather
at 2018-02-01T15:55
at 2018-02-01T15:55
By Kyle
at 2018-02-06T13:45
at 2018-02-06T13:45
By Dora
at 2018-02-06T18:28
at 2018-02-06T18:28
By Catherine
at 2018-02-11T05:13
at 2018-02-11T05:13
By Joseph
at 2018-02-13T03:36
at 2018-02-13T03:36
By Agnes
at 2018-02-17T13:09
at 2018-02-17T13:09
By Bethany
at 2018-02-20T09:38
at 2018-02-20T09:38
By Victoria
at 2018-02-22T04:20
at 2018-02-22T04:20
Related Posts
40K內 Adobe系列軟體、吃雞 (含螢幕)
By Blanche
at 2017-12-06T15:04
at 2017-12-06T15:04
賣一台有溫度的電腦&買一台迅速安心的電
By Lydia
at 2017-12-06T14:31
at 2017-12-06T14:31
70K 繪圖機+螢幕
By Carolina Franco
at 2017-12-06T14:15
at 2017-12-06T14:15
部份鋁的機殼
By Joe
at 2017-12-06T14:06
at 2017-12-06T14:06
有人用電動升降桌嗎?
By Jake
at 2017-12-06T13:23
at 2017-12-06T13:23